DsPro WFH Guide
Everything you need for your Work From Home (WFH) shift.
Start your shift, find calling instructions, or fix common issues.
START HERE
What are you doing today?
Choose one path. Returning users will go straight to the guide next time.
Last updated:
Quick access
What do you need right now?
Choose work OSOnlineApp installed
SHIFTStart My ShiftRun the checks before taking calls.
HELPQuick HelpFix a call, VPN, audio, or dialer problem.
CALLSCalling GuidesZoiper instructions and Windows 3CXPhone backup.
SETUPFirst-Time SetupRequirements, RustDesk, VPN, and initial setup.
Keep DsPro WFH Guide on this device.
How to installInstall it like an app for faster access and offline help.
IT VIEW
IT reference tools
IT view shows Windows and Mac guidance together for support/reference. It is not saved as the employee’s work OS.
Quick Help / Emergency
Use these checks first. If the problem remains, contact the Floor Manager immediately—do not wait for the hourly check-in.
GUIDED TROUBLESHOOTING
What’s wrong?
View all quick-reference fixes
Windows
- Can't make calls
- Confirm OpenVPN shows Securely Connected! → confirm Zoiper has the green account check → try the call again → if it still fails, contact the Floor Manager.
- Can't receive calls
- Confirm the VPN is connected and Zoiper is open with the green account check. Do not open both Zoiper and 3CXPhone at the same time.
- VPN won't connect
- Check that normal websites load → reconnect OpenVPN once → if it still fails or asks for credentials, take a screenshot of the message and contact the Floor Manager. Do not edit the VPN profile.
- No green check in Zoiper
- Confirm OpenVPN is connected → wait 15 seconds → if the green check still does not appear, contact the Floor Manager. Do not edit the Zoiper account.
- Customer can't hear me
- Check the headset connection → make sure the headset and Zoiper microphone are not muted → if the issue continues, contact the Floor Manager.
- I can't hear the customer
- Check the headset connection and volume → confirm the correct physical headset is being used → if the issue continues, contact the Floor Manager. Do not change Zoiper audio-device settings.
- Call drops or poor audio
- Keep the VPN connected → check that your internet connection is stable → avoid switching Wi-Fi networks during calls → report repeated drops or broken audio with the approximate time.
- Zoiper crashed or failed
- If you are not on a call, fully exit Zoiper → open 3CXPhone as the backup → keep the VPN connected → report the Zoiper failure.
- Unknown error
- Take a screenshot and send it privately to the Floor Manager or IT. Never post passwords, credentials, VPN profiles, or other sensitive information in the group.
Mac
- Can't make calls
- Confirm Tunnelblick shows Connected → confirm Zoiper has the green account check → try the call again → if it still fails, contact the Floor Manager.
- Can't receive calls
- Confirm Tunnelblick is connected and Zoiper is open with the green account check. On Mac, Zoiper is the only dialer.
- VPN won't connect
- Check that normal websites load → reconnect Tunnelblick once → if it still fails or asks for credentials, take a screenshot of the message and contact the Floor Manager. Do not import or edit profiles.
- No green check in Zoiper
- Confirm Tunnelblick is connected → wait 15 seconds → if the green check still does not appear, contact the Floor Manager. Do not edit the Zoiper account.
- Customer can't hear me
- Check the headset connection → make sure Zoiper is not muted → confirm macOS allows Zoiper to use the microphone under System Settings → Privacy & Security → Microphone → if the issue continues, contact the Floor Manager.
- I can't hear the customer
- Check the headset connection and volume → if the issue continues, contact the Floor Manager. Do not change Zoiper audio-device settings.
- Call drops or poor audio
- Keep Tunnelblick connected → check that your internet connection is stable → avoid switching Wi-Fi networks during calls → report repeated drops or broken audio with the approximate time.
- Zoiper crashed or failed
- Keep Tunnelblick connected and contact the Floor Manager. On Mac, Zoiper is the only dialer; 3CXPhone is not used.
- Unknown error
- Take a screenshot and send it privately to the Floor Manager or IT. Never post passwords, credentials, VPN profiles, or other sensitive information in the group.
REPORT A PROBLEM
Prepare one useful report for IT
Nothing is sent automatically. The copied report adds safe environment details automatically. Attach any screenshot separately.
Is something in this guide unclear?
Feedback is never sent automatically. You choose what to write and copy, then send it privately to the Floor Manager or IT.
SHIFT CHECKLIST
Start and finish correctly
Checks reset automatically on a new day. They stay only in this browser; DsPro does not receive or track them.
Choose Windows or MacChoose Windows or Mac above to use the shift checklist.
Start my shift
End my shift
—INSTALL THIS GUIDE
Install this guide like an app
Recommended: Install this guide on the device you use to open it. It starts faster and keeps core help available offline after the first online load.
The guide will show the best instructions for this device and browser.
Recommended for this device
Other devices and browsers
iPhone or iPad — Safari
- Open this page in Safari.
- Tap the Page Menu or Share.
- Choose Add to Home Screen. If it is missing, use Edit Actions to add it.
- Turn on Open as Web App when offered, then tap Add.
Android — Chrome
- Open this page in Google Chrome.
- Tap More (⋮).
- Choose Install app, Install and create shortcut, or Add to Home screen, depending on your Chrome version.
- Confirm the installation and open the guide once while online.
Android — other browser
Look in your browser menu for Install app or Add to Home screen. If that option is unavailable, open this guide in Chrome to install it.
Windows — Microsoft Edge
- Open this page in Edge.
- Use the install icon in the address bar when shown, or open Settings and more (…) → Apps and choose the install option for this site.
- Open DsPro WFH Guide from Start after installation.
Windows — Google Chrome
- Open this page in Chrome.
- Use the install icon when shown, or open More (⋮) and choose the page/app installation option.
- Open DsPro WFH Guide from Start after installation.
Windows — Firefox
If Firefox shows a web-app/install control for this page, use it. If it does not, keep using the guide in Firefox or open it in Edge or Chrome to install it as an app.
Windows — Opera, Comet, or another browser
Keep using the guide in your current browser. If that browser does not offer an app-install option, open the guide in Edge or Chrome to install it.
Mac — Safari
- On macOS Sonoma 14 or later, open this page in Safari.
- Choose File → Add to Dock, or Share → Add to Dock.
- Keep the name DsPro WFH Guide and click Add.
Mac — Google Chrome
- Open this page in Chrome.
- Use the install icon when shown, or Chrome's page/app installation option.
- Open the installed guide once while online.
Mac — other browser
Keep using the guide in your current browser. For an installed app experience, use Safari on macOS Sonoma 14 or later or Google Chrome.
Other device or browser
The guide still works in current modern browsers. Look for an install or Add to Home Screen option, or keep the page bookmarked.
Compatibility: Current Chrome, Edge, Firefox, Safari, Opera, Comet, and other modern Chromium-family browsers can use the guide. Internet Explorer is retired and is not supported.
Important: Open the installed guide once while online so the current content is saved for offline use.
01 / REQUIREMENTS
Before your setup
First-time setup order: Check the requirements → open RustDesk → let DsPro IT configure and test the work apps → complete the test call → notify the Floor Manager when IT confirms you are ready.
Internet
You need at least 30 Mbps download and 10 Mbps upload. An Ethernet connection is strongly preferred; stable Wi-Fi meeting both minimums is acceptable.
The completed speed test should show ping/latency, download, and upload. If a deeper connection-quality check is needed, IT will review the connection with you.
Use the work computer, connected to the network you will actually use for work, in your intended work location.
- Open speedtest.net.
- Press the main GO button. Wait until the entire test finishes.
- The results show ping/latency, download, and upload. Send a screenshot of the completed results page.
Headset
A USB headset with a working microphone is preferred. Any other headset must work with the actual computer you will use.
Test your headset and microphone by making a WhatsApp call or using a similar calling app on your work computer. Report any concerns or problems before setup. IT will also carry out a test call.
Computer
Your work computer needs at least 8 GB of RAM. Choose your work computer at the top of this guide so you only see the specifications and steps that apply to you.
Choose Windows or Mac above to see the correct computer requirements and screenshot steps.
Windows
Use an 8th-generation Intel Core i3 or newer, or an AMD processor with comparable or better performance.
- Click the Windows search box, or press Windows + S, and type About your PC.
- Open the About your PC system settings result.
- Under Device specifications, find your processor next to Processor and memory next to Installed RAM.
- Send a screenshot to the IT employee helping you with your setup.
Take a screenshot: Press Windows + Shift + S, drag to select the relevant area, then open your message to the IT employee and press Ctrl + V to paste it. Send the message.
Windows 10: search and specifications
Open About your PC, then check the highlighted Processor and Installed RAM fields. Example values will differ from your computer.
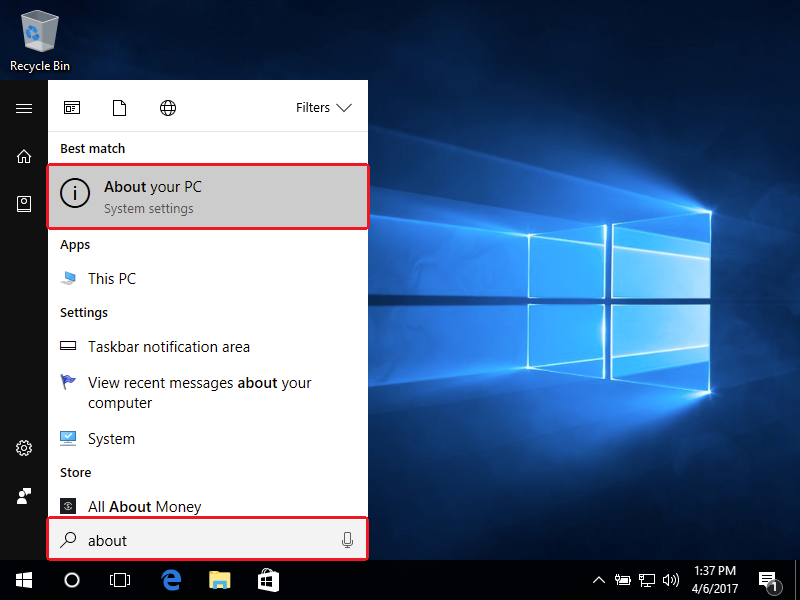
1 Open the About your PC result.
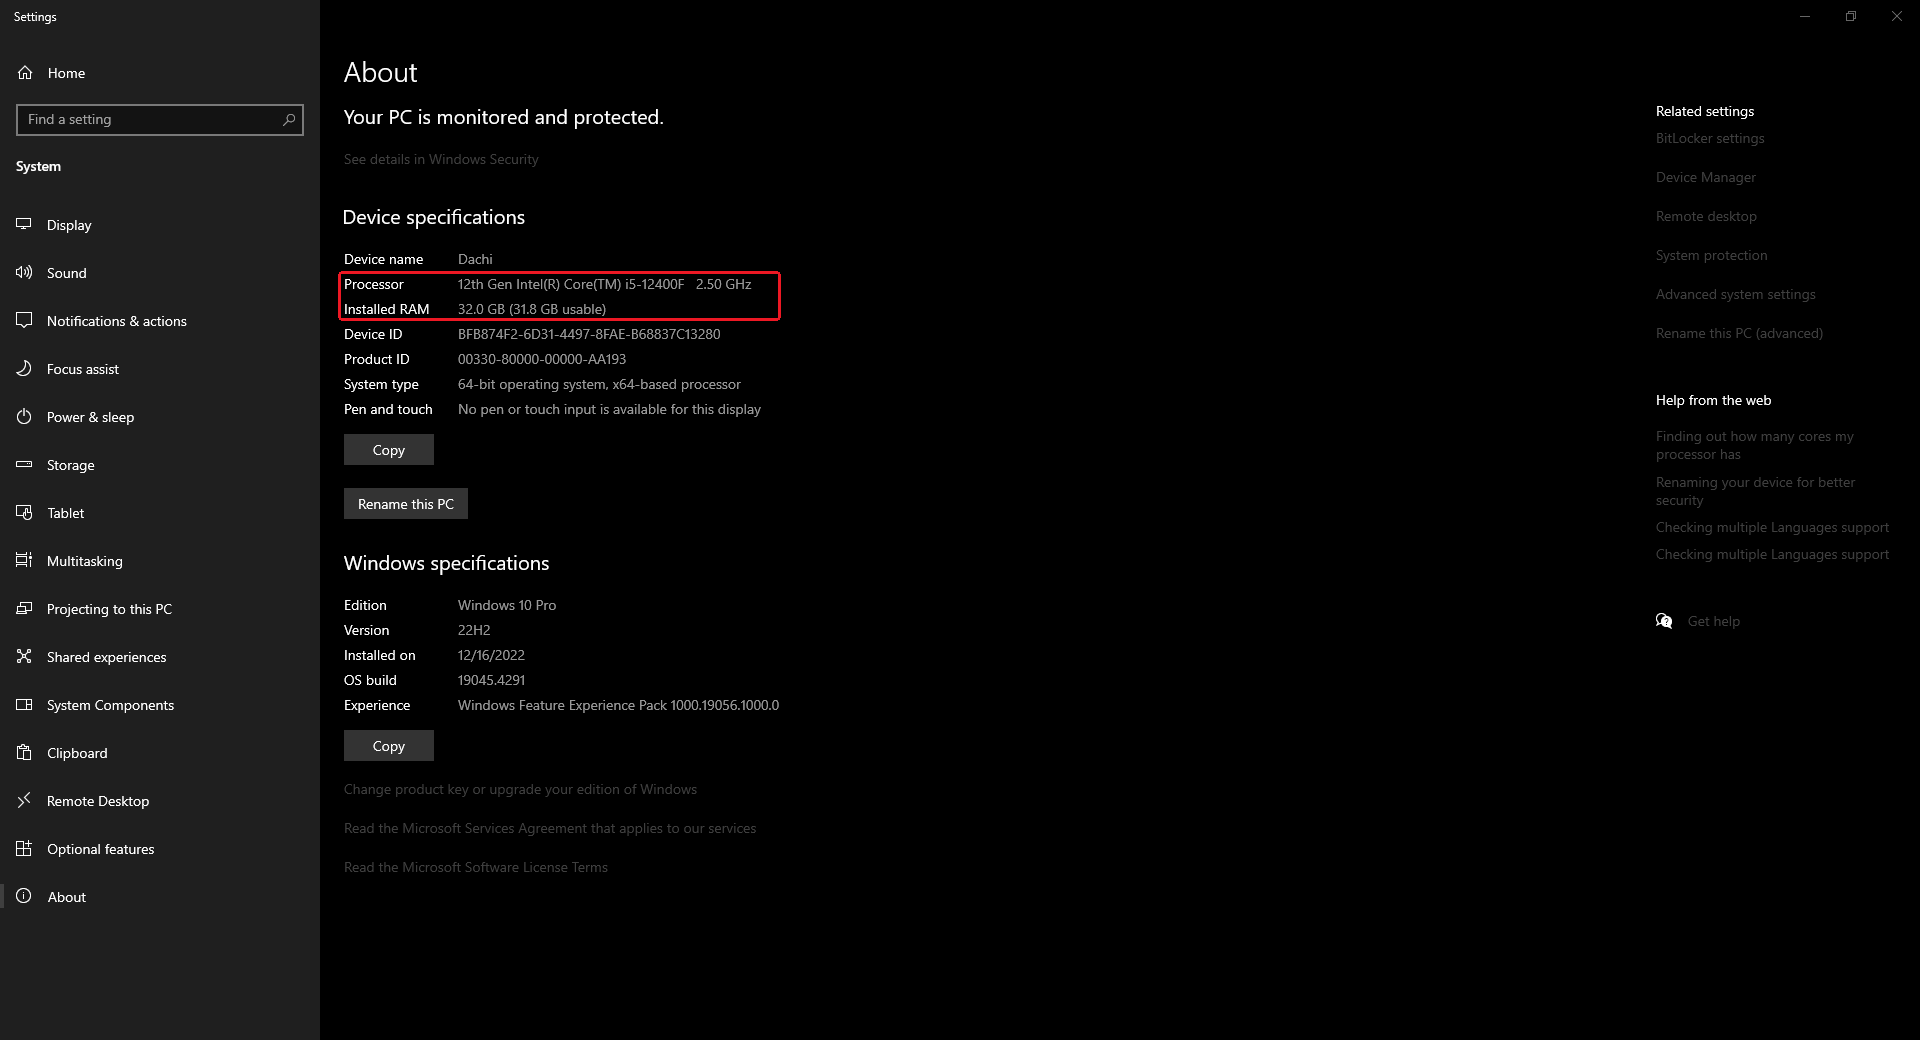
2 Check Processor and Installed RAM.
Windows 11: search and specifications
Open About your PC, then check the highlighted Processor and Installed RAM fields. Example values will differ from your computer.
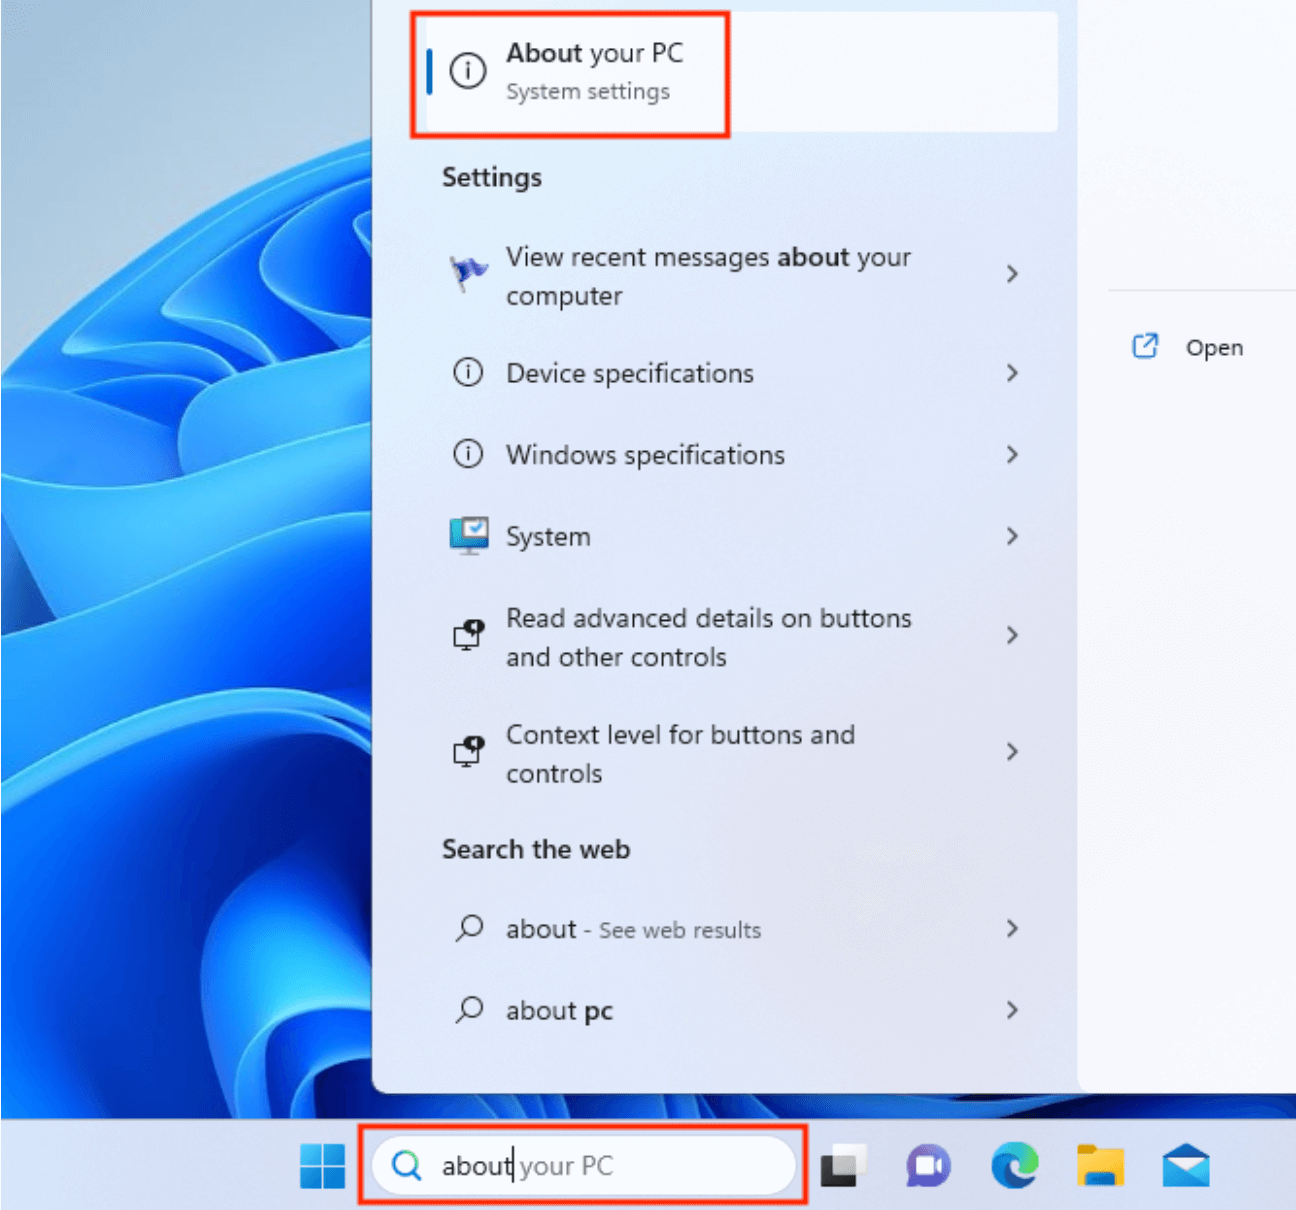
1 Open the About your PC result.
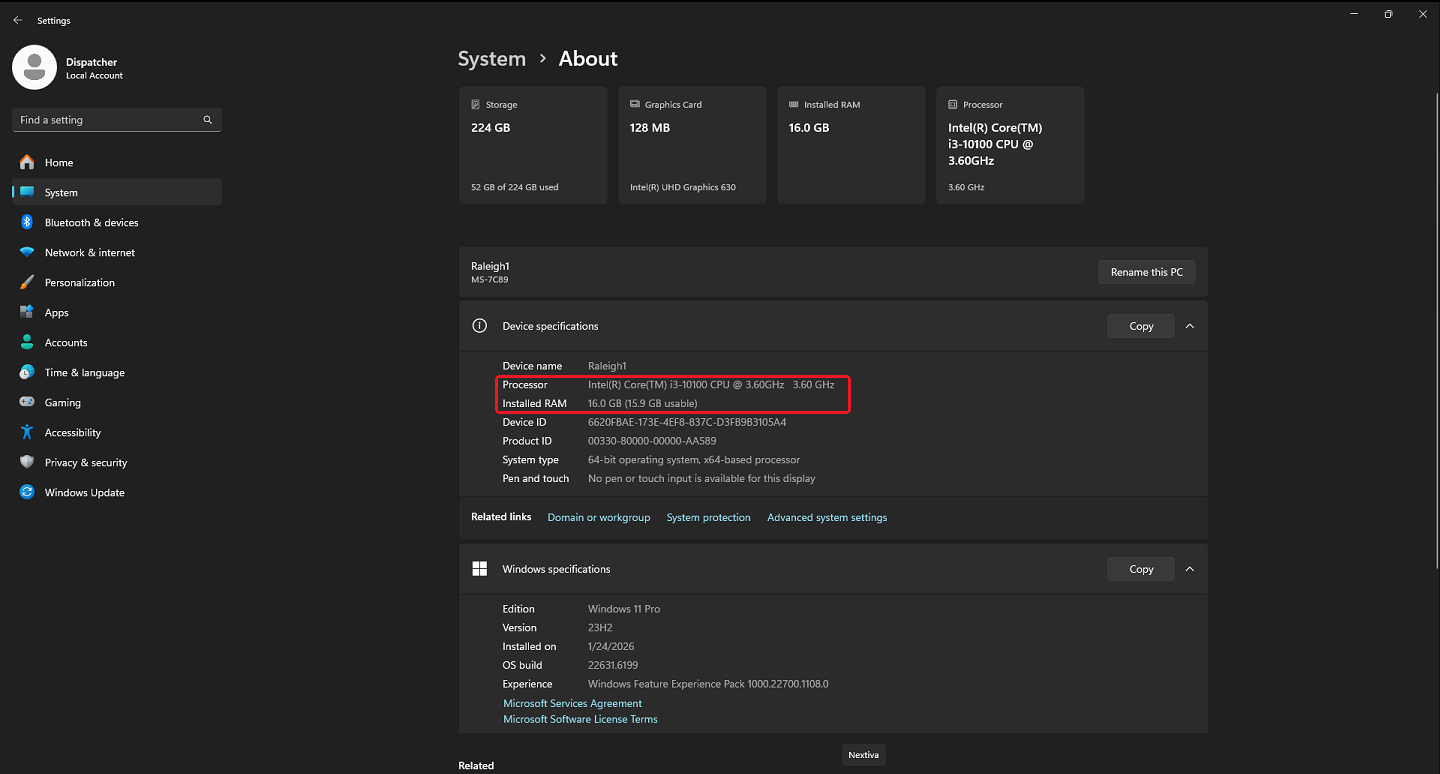
2 Check Processor and Installed RAM.
Mac
The DsPro standard is Apple silicon M1 or newer. Intel Macs are supported only when IT explicitly approves an exception.
- Click the Apple menu in the top-left corner, then choose About This Mac.
- Find your Mac model, Chip or Processor, and Memory.
- Send a screenshot to the IT employee helping you. Do not send your serial number; crop or cover it before sending.
Your Mac may look slightly different depending on your macOS version. Older Intel Macs may show Processor, while Apple silicon Macs show Chip. The important fields are the model, Chip or Processor, and Memory.
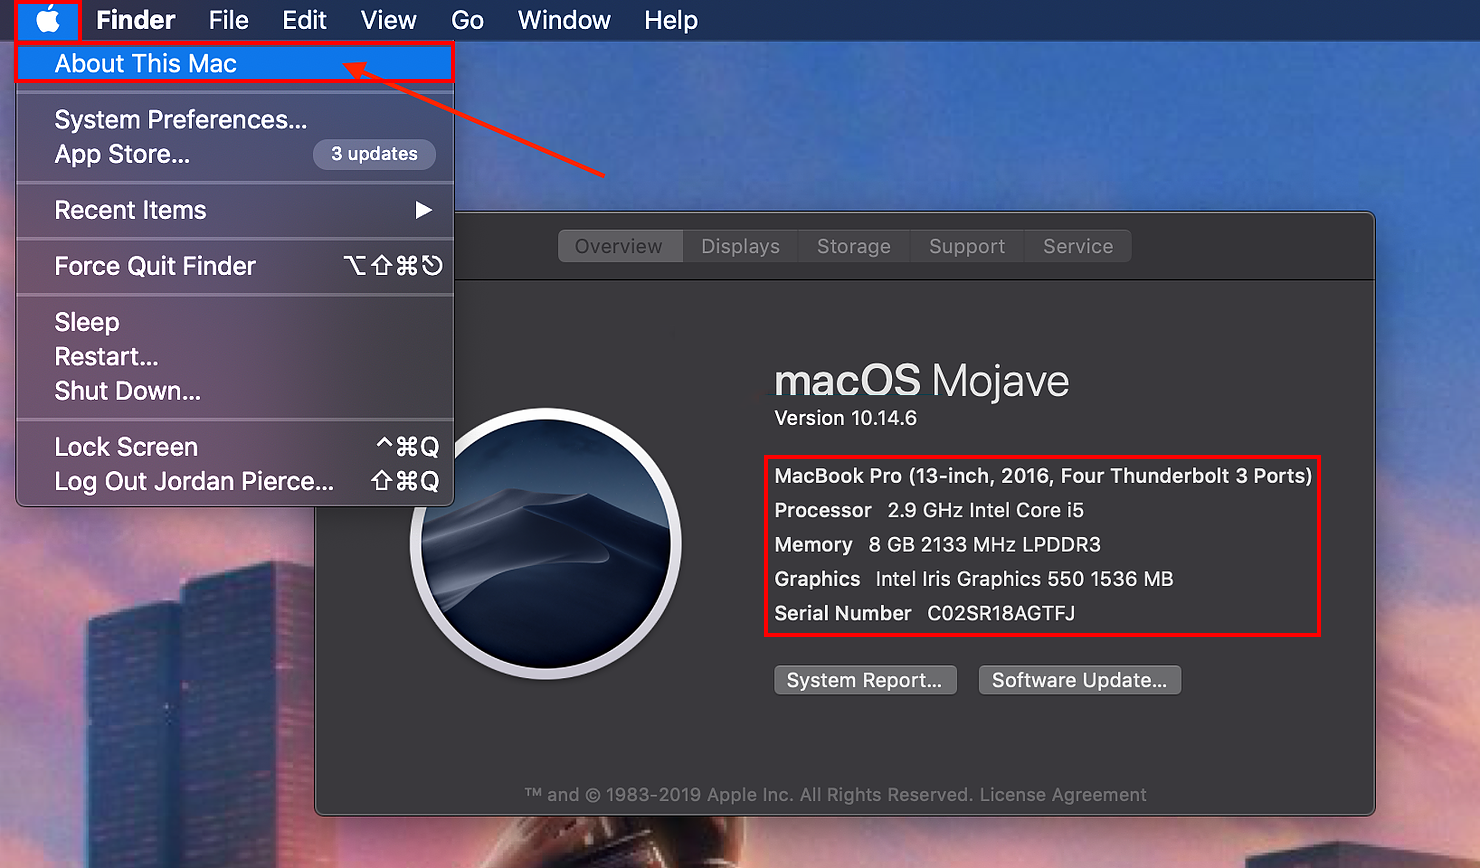
1Open Apple menu → About This Mac.
2Check Mac model, Chip or Processor, and Memory. The serial number is not needed.
Privacy: Crop or cover the serial number before sending your screenshot to DsPro IT.
Send these privately before setup
- Your full name and station/department.
- Your work computer operating system, plus a screenshot of its specifications.
- Connection type: Ethernet or Wi-Fi.
- Completed speed test screenshot showing ping/latency, download, and upload, with at least 30 Mbps download and 10 Mbps upload.
- Confirmation that your headset and microphone work, or details of issues.
02 / RUSTDESK
Remote setup with IT
Follow the guide for your computer. Stay at the computer during setup, with your headset connected for the test call and training.
Windows
Open the official RustDesk download page. For Intel or AMD PCs, use Windows → x86-64 → EXE. Open the downloaded file. Ask the IT employee helping you with your setup first if your computer uses an ARM or Snapdragon-based processor.
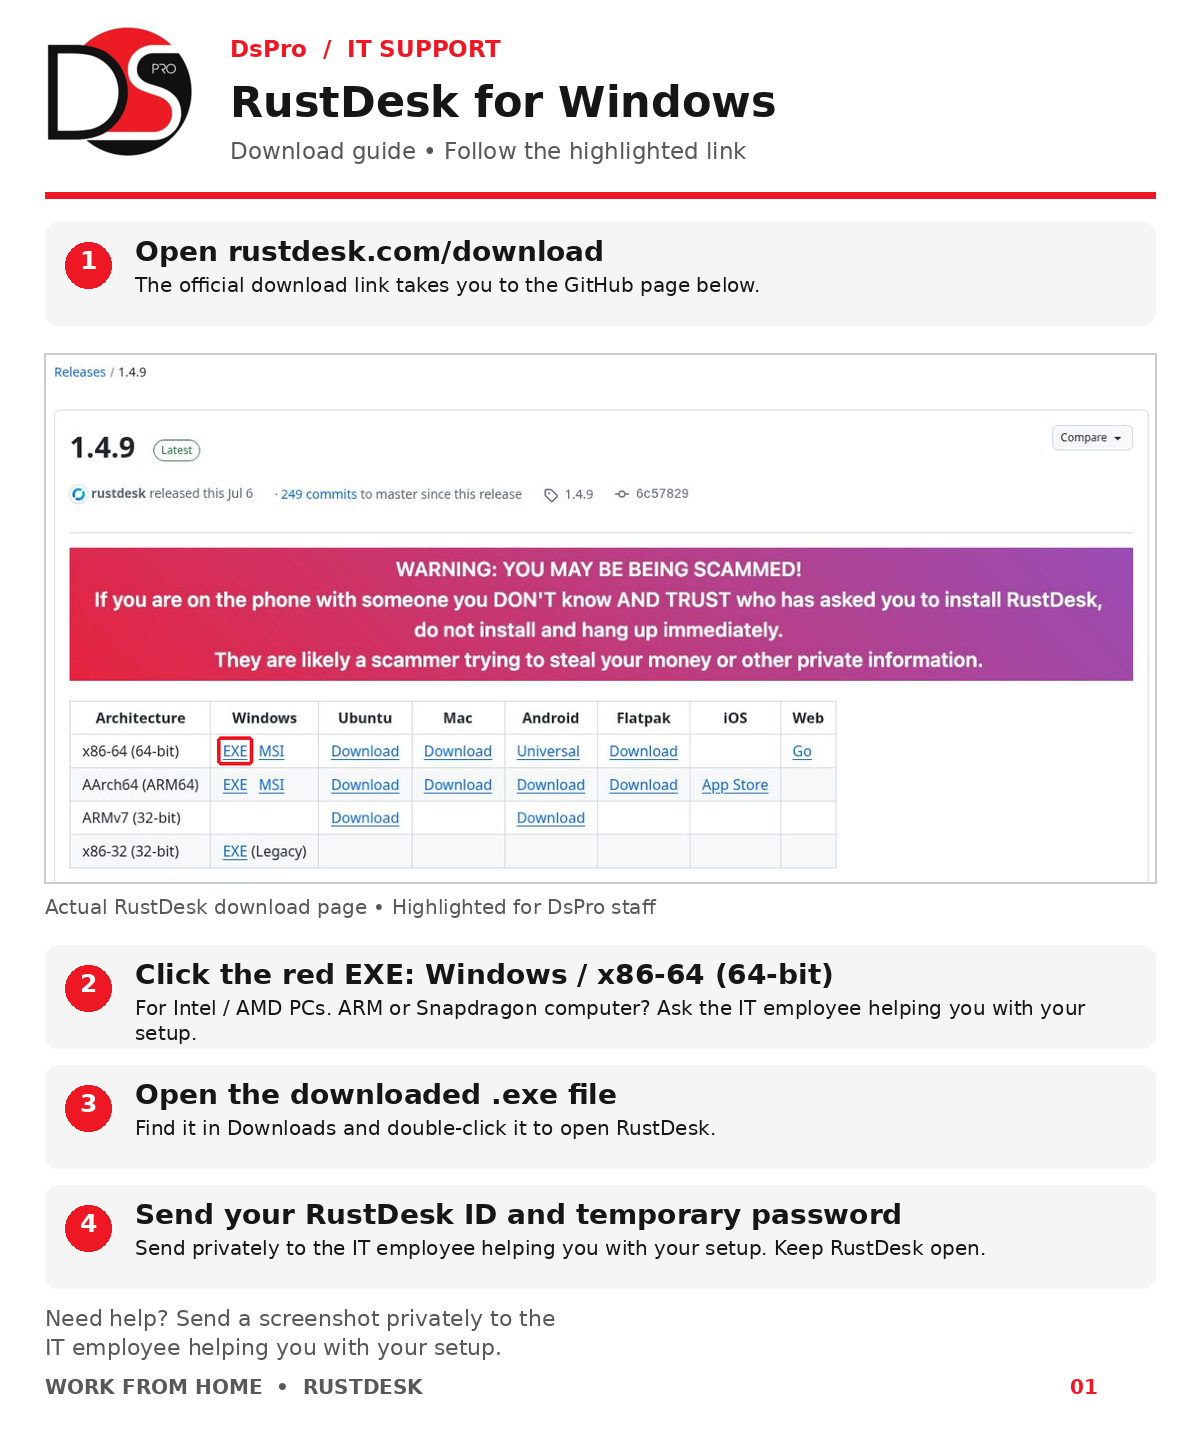
RustDesk release numbers change over time. Use the latest stable release shown on the official download page; the screenshot is an example of where the download links appear.
Mac
Check Apple menu → About This Mac. Use ARM64 for Apple M-series Macs and x86-64 for Intel Macs. Open the DMG, drag RustDesk to Applications, then open it. The IT employee helping you with your setup will help with permissions.
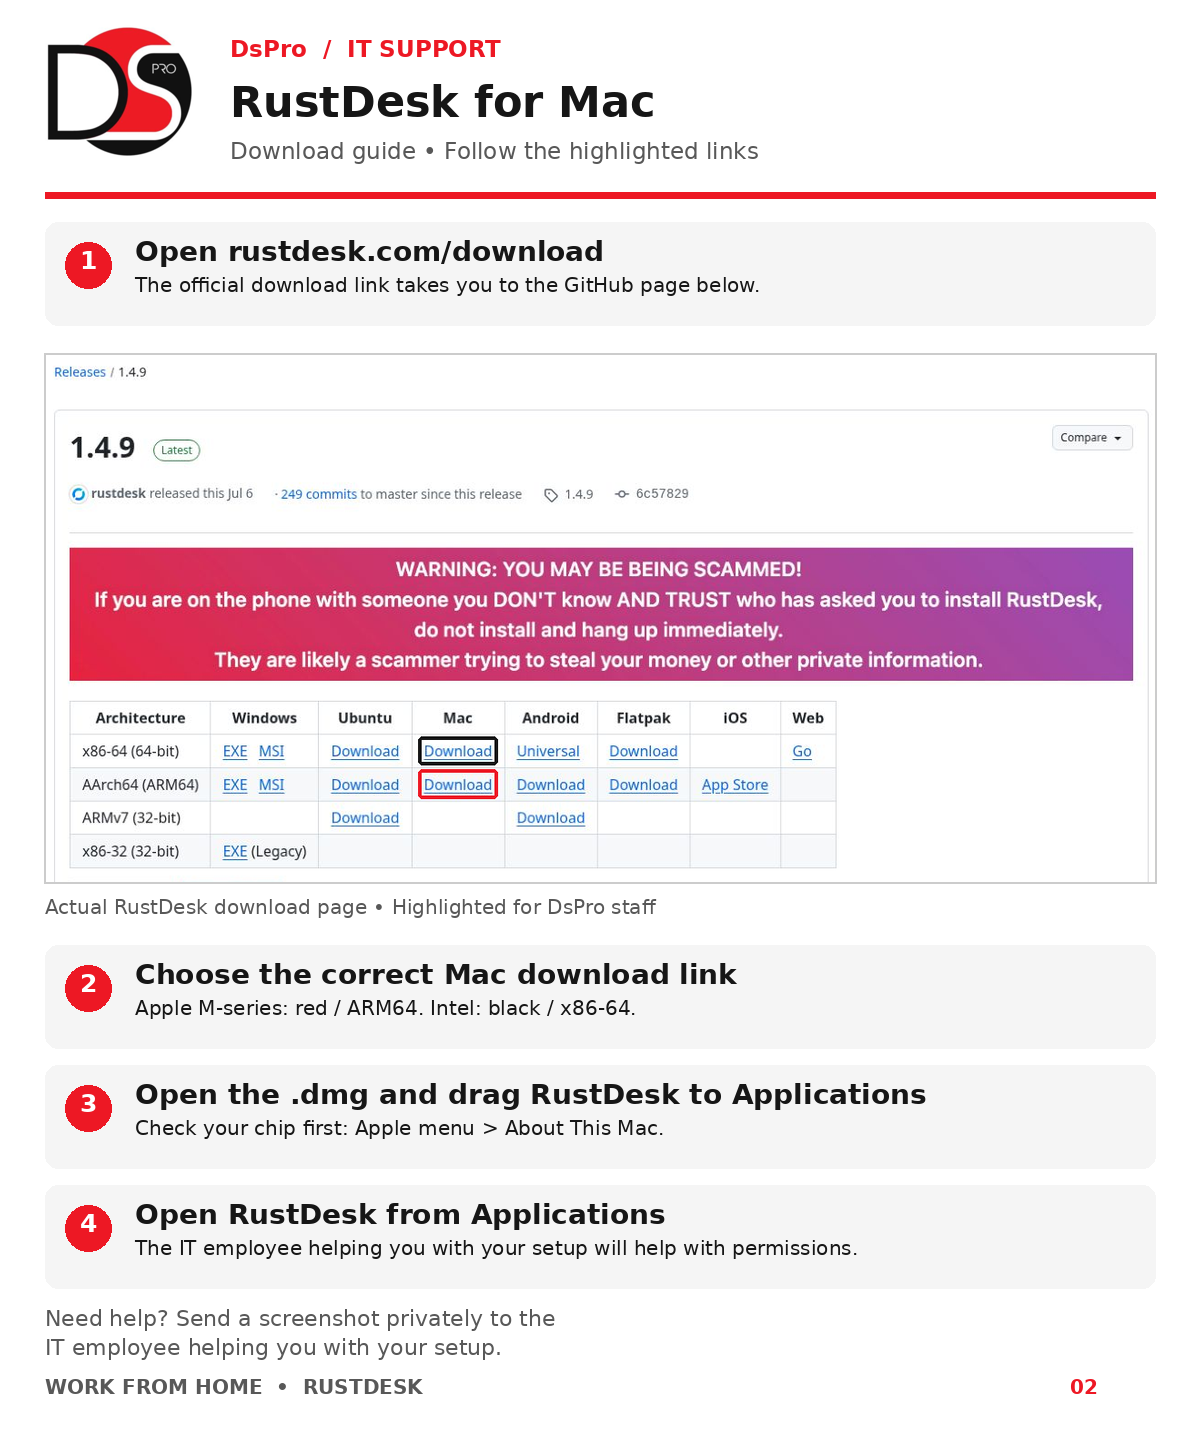
RustDesk release numbers change over time. Use the latest stable release shown on the official download page; the screenshot is an example of where the download links appear.
Mac: allow RustDesk permissions
- Open RustDesk from Applications. If macOS asks for permission, choose Open System Settings or follow the prompt.
- Under System Settings → Privacy & Security, allow RustDesk under Accessibility and the screen-recording permission, shown as Screen Recording or Screen & System Audio Recording depending on your macOS version.
- If RustDesk still cannot control the keyboard or mouse, allow Input Monitoring when RustDesk or the IT employee helping you asks for it.
- After changing a permission, quit and reopen RustDesk. If macOS still does not apply the permission, IT may ask you to restart the Mac.
These permissions are required by macOS for remote support. Only grant them to the RustDesk app you downloaded from the official RustDesk website.
Send your RustDesk details
Find ID and One-time Password on the left. Send your own details privately to the IT employee helping you with your setup. Keep RustDesk open and stay nearby. Never send your computer, email, or VPN password.
The ID and One-time Password shown in the screenshot are examples.
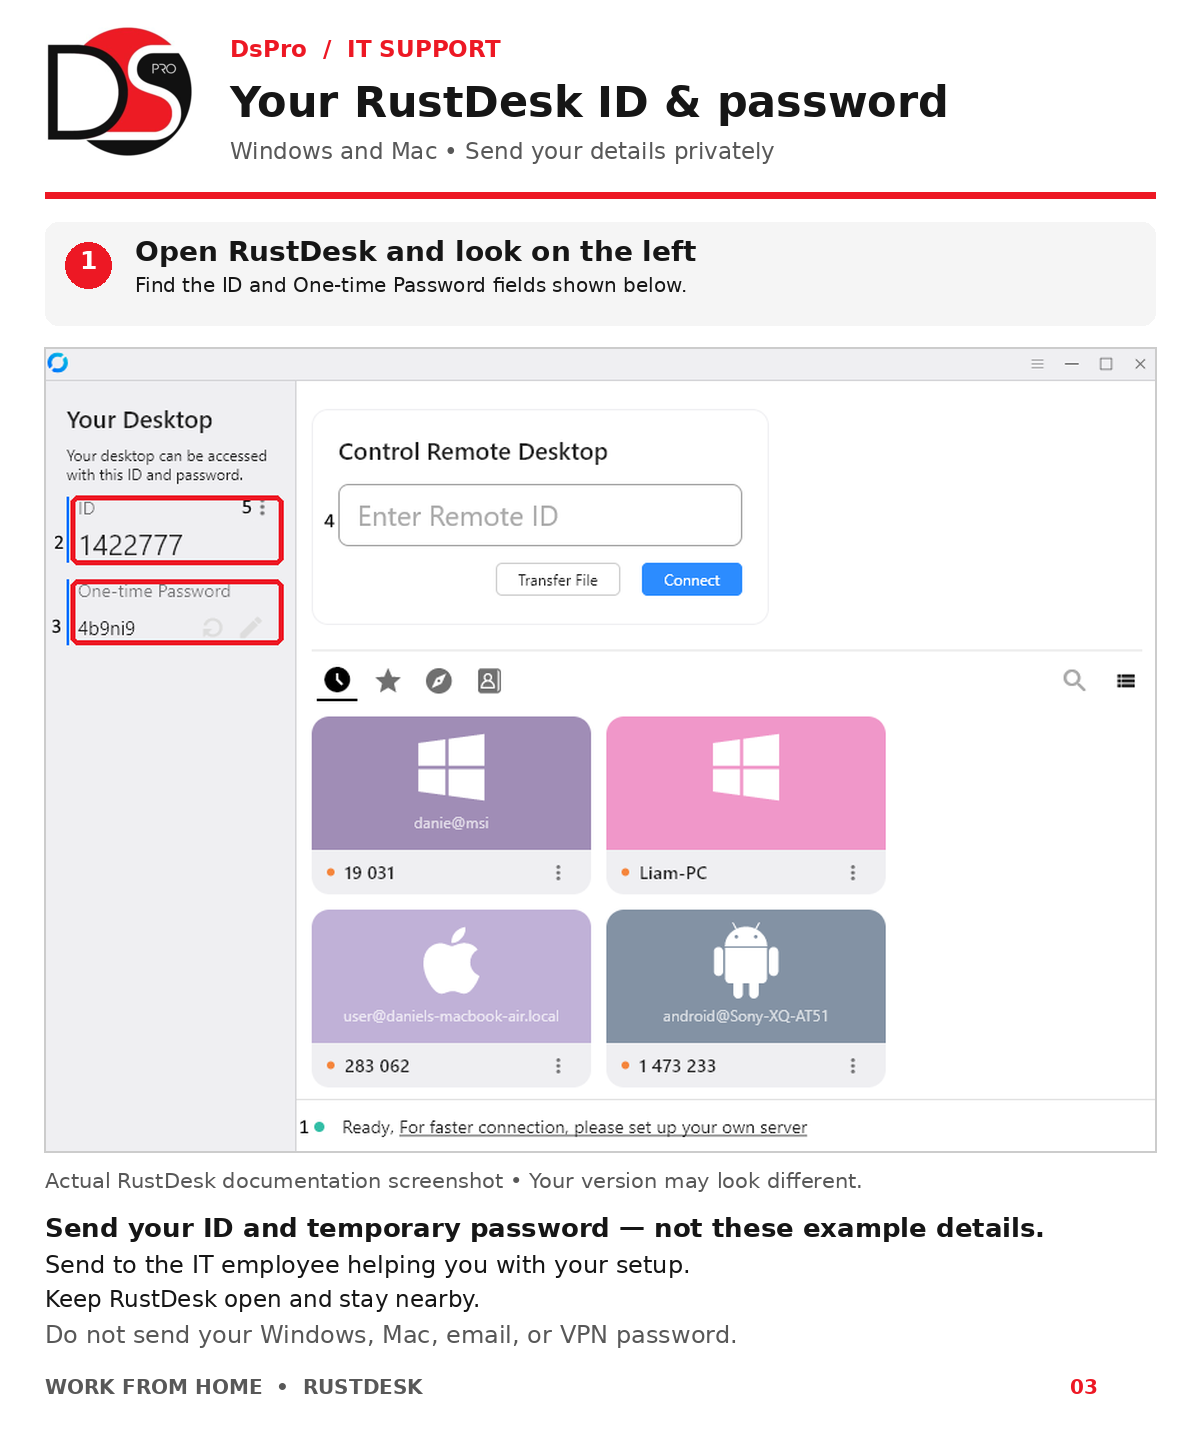
Look for the red boxes: send only your RustDesk ID and current One-time Password privately to the IT employee helping you.
03 / DAILY ROUTINE
Your shift, step by step
Start, check in, finish
- Connect to your work network and make sure your tested headset is connected.
- Connect your work VPN. Launch OpenVPN Connect and wait for Securely Connected!Open Tunnelblick and wait for Connected. Your work VPN credentials are already saved by IT.
- Open Zoiper and check the green check mark beside your account. Opening the dialer makes you available; no queue code is needed.
- Post in the main DsPro WhatsApp group:
I have started working.
- Keep your VPN and dialer running. Use Zoiper as your main dialer and 3CXPhone as the backup; fully exit one before opening the other.Zoiper is your only dialer. Send “All good” in the DsPro group every hour while working.
- At the end of your shift, finish all calls and fully exit the dialer. Then disconnect OpenVPN Connect.Then disconnect Tunnelblick. Minimizing the calling application does not end your availability.
Need help?
Contact the Floor Manager on duty as soon as a problem occurs. They will speak with IT, and IT will contact you.
Explain what happened, when it happened, which application you were using, and whether the VPN was connected. Send a screenshot of any error privately.
Do not wait for your hourly check-in. Do not change audio, account, or VPN settings yourself.
04 / VPN — WINDOWS
OpenVPN Connect (Windows)
Windows only. Your OpenVPN work profile and credentials are already saved by IT.
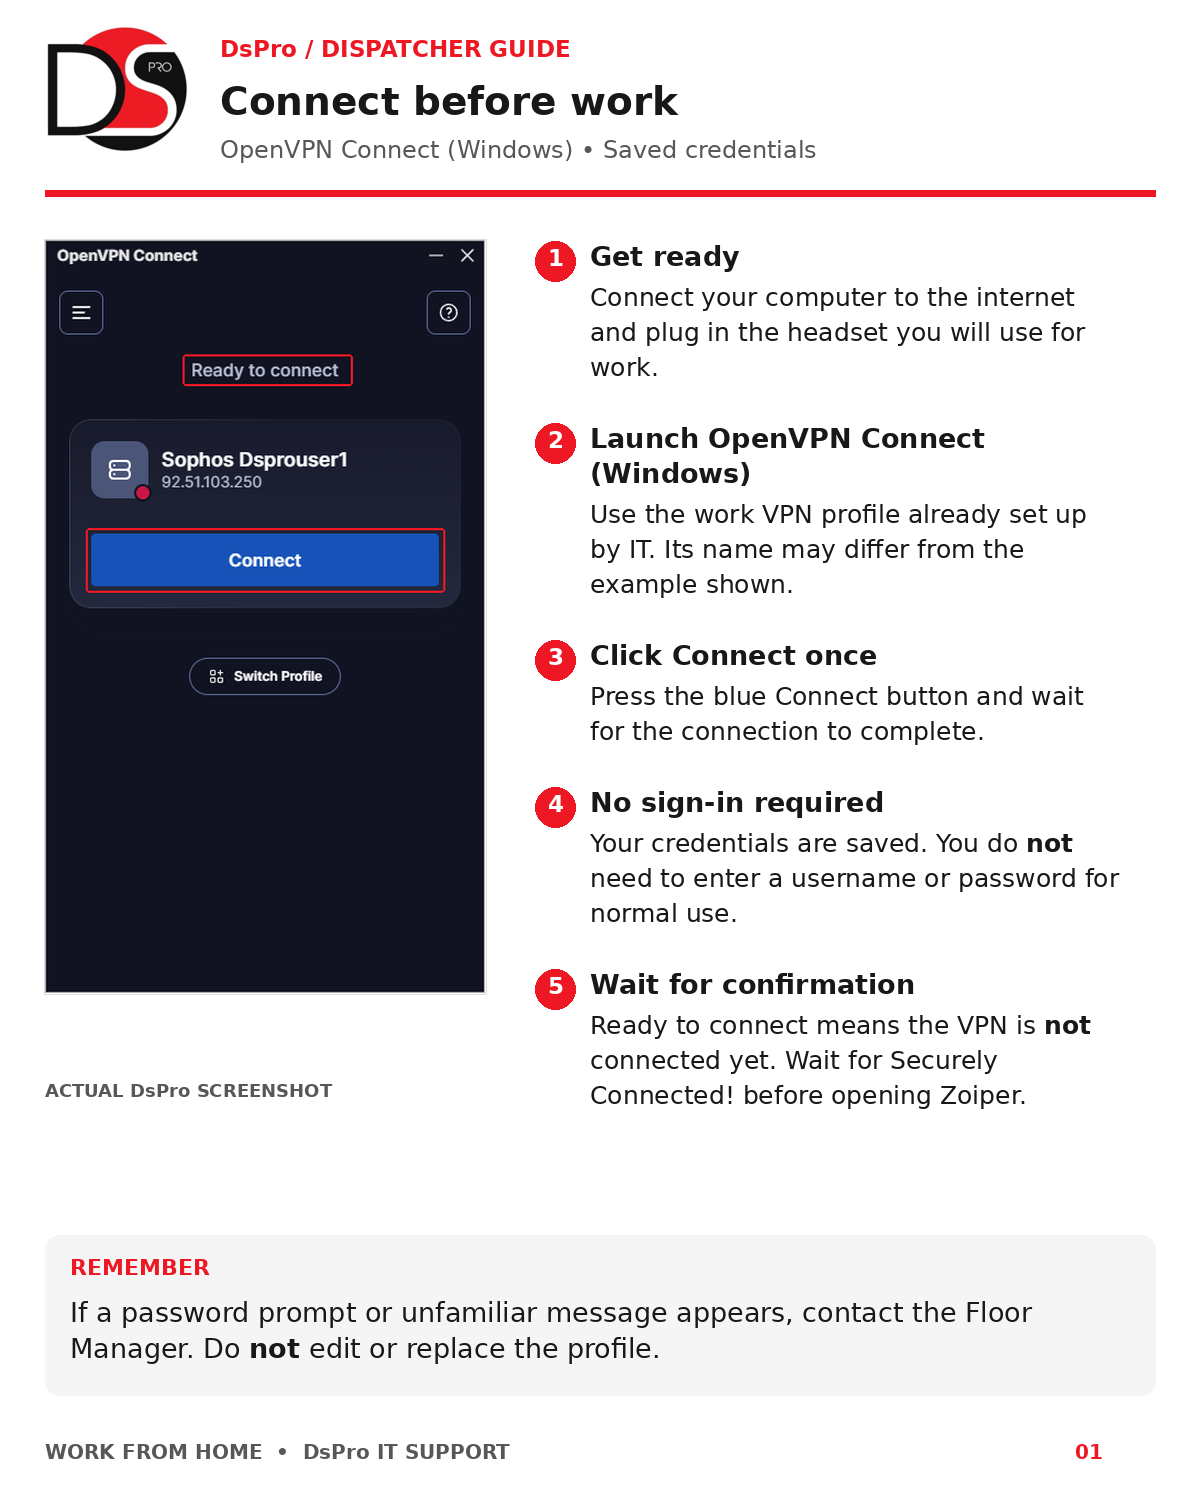
Connect before work
- Get ready: Connect your computer to the internet and plug in the headset you will use for work.
- Launch OpenVPN Connect (Windows): Use the work VPN profile already set up by IT. Its name may differ from the example shown.
- Click Connect once: Press the blue Connect button and wait for the connection to complete.
- No sign-in required: Your credentials are saved. You do not need to enter a username or password for normal use.
- Wait for confirmation: Ready to connect means the VPN is not connected yet. Wait for Securely Connected! before opening Zoiper.
If a password prompt or unfamiliar message appears, contact the Floor Manager. Do not edit or replace the profile.
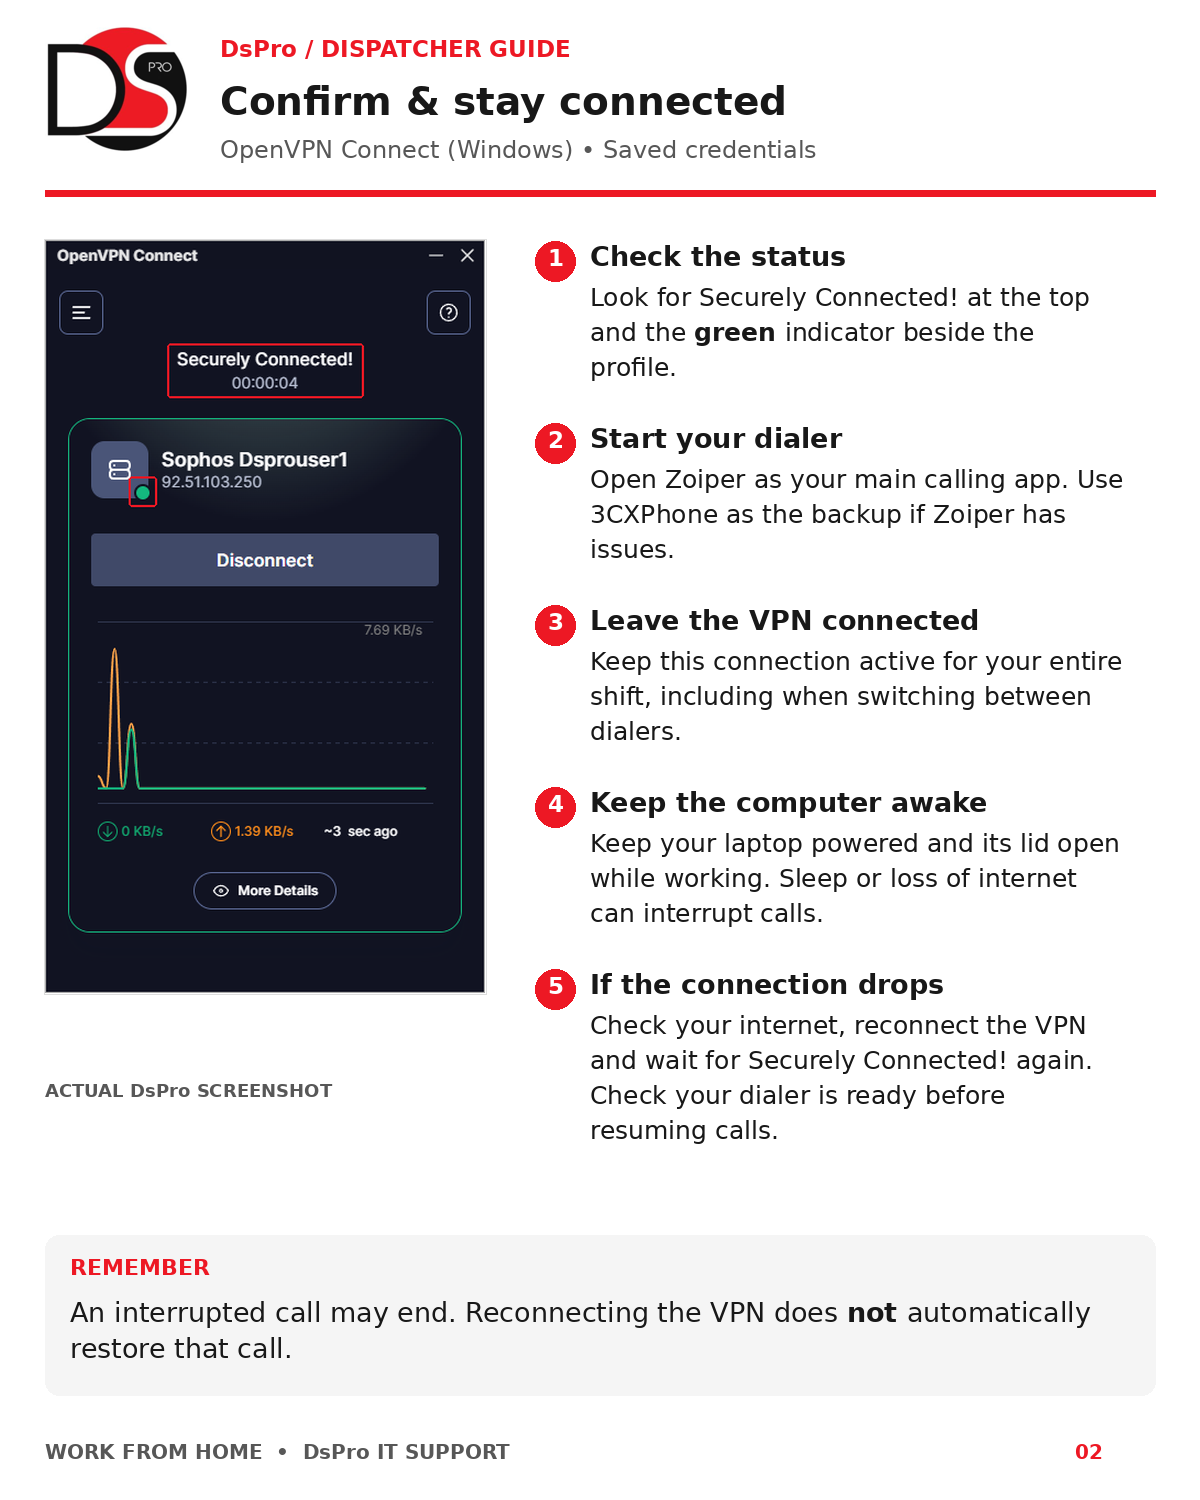
Confirm & stay connected
- Check the status: Look for Securely Connected! at the top and the green indicator beside the profile.
- Start your dialer: Open Zoiper as your main calling app. Use 3CXPhone as the backup if Zoiper has issues.
- Leave the VPN connected: Keep this connection active for your entire shift, including when switching between dialers.
- Keep the computer awake: Keep your laptop powered and its lid open while working. Sleep or loss of internet can interrupt calls.
- If the connection drops: Check your internet, reconnect the VPN and wait for Securely Connected! again. Check that your dialer is ready before resuming calls.
An interrupted call may end. Reconnecting the VPN does not automatically restore that call.
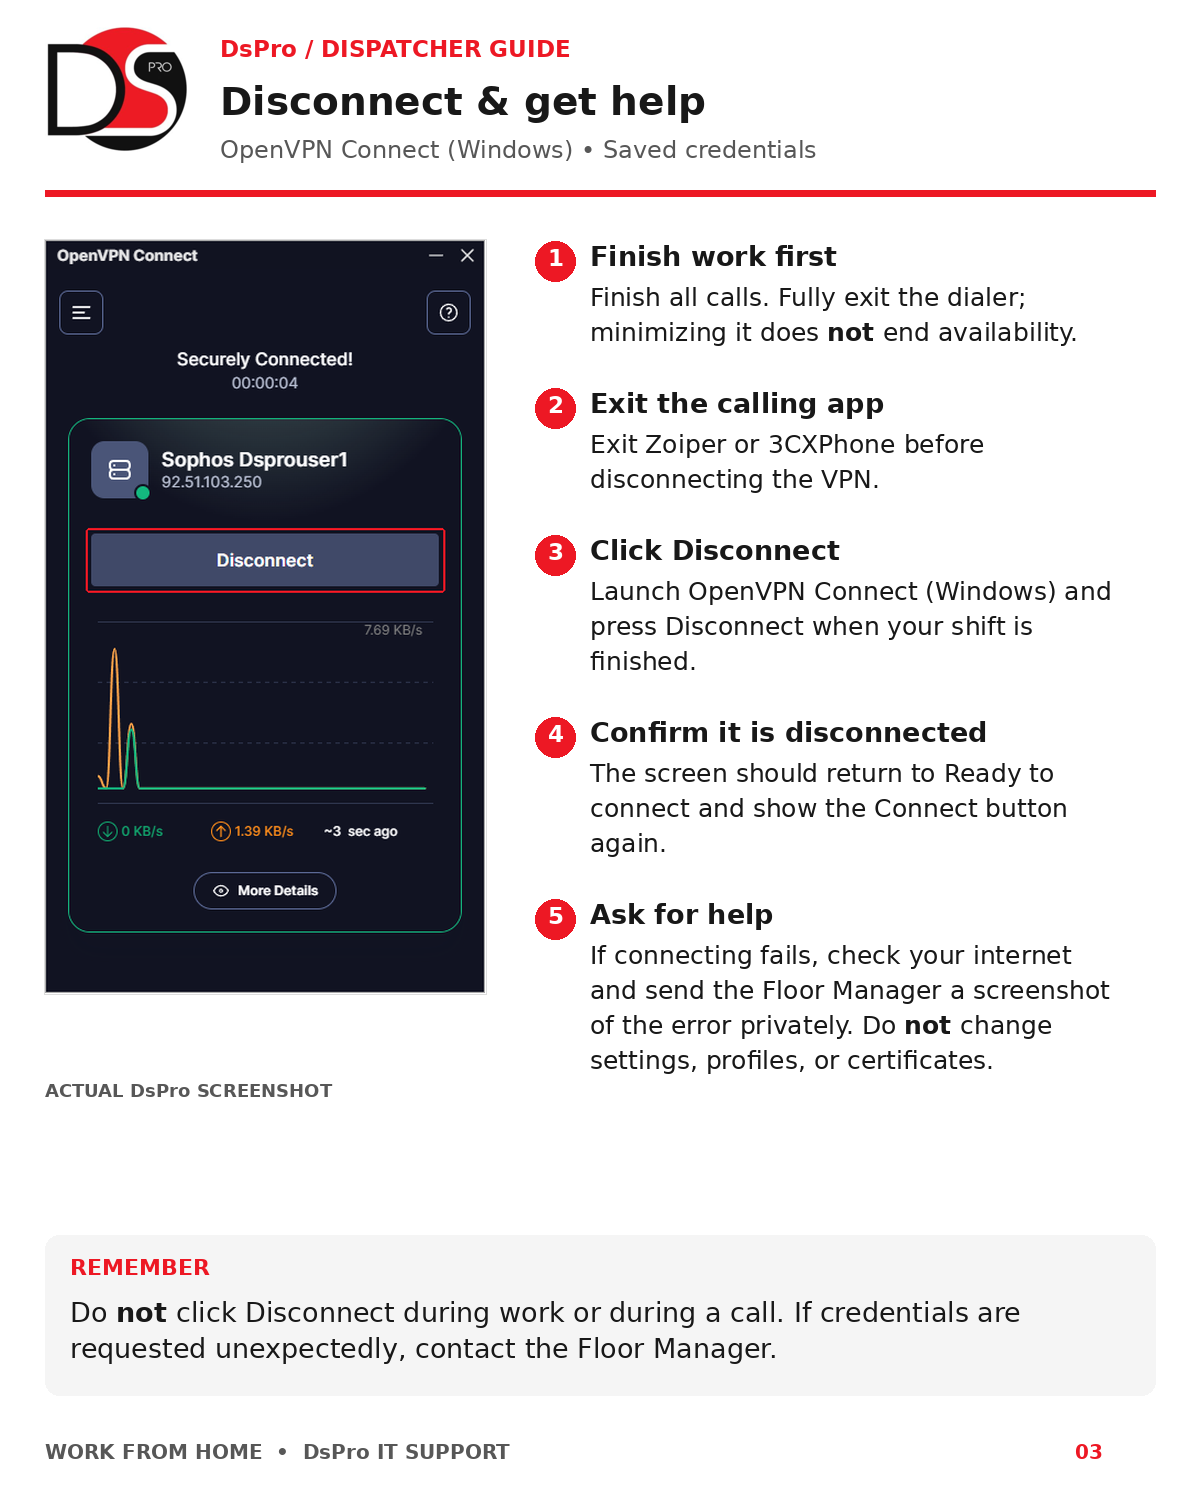
Disconnect & get help
- Finish work first: Finish all calls. Closing the dialer ends your availability.
- Exit the calling app: Exit Zoiper or 3CXPhone before disconnecting the VPN.
- Click Disconnect: Launch OpenVPN Connect (Windows) and press Disconnect when your shift is finished.
- Confirm it is disconnected: The screen should return to Ready to connect and show the Connect button again.
- Ask for help: If connecting fails, check your internet. Send the Floor Manager the error screenshot privately. Leave settings unchanged.
Do not click Disconnect during work or during a call. If credentials are requested unexpectedly, contact the Floor Manager.
04 / VPN — MAC
Tunnelblick (Mac)
Mac only. IT has installed your Tunnelblick work VPN profile and saved the credentials.
Connect before work
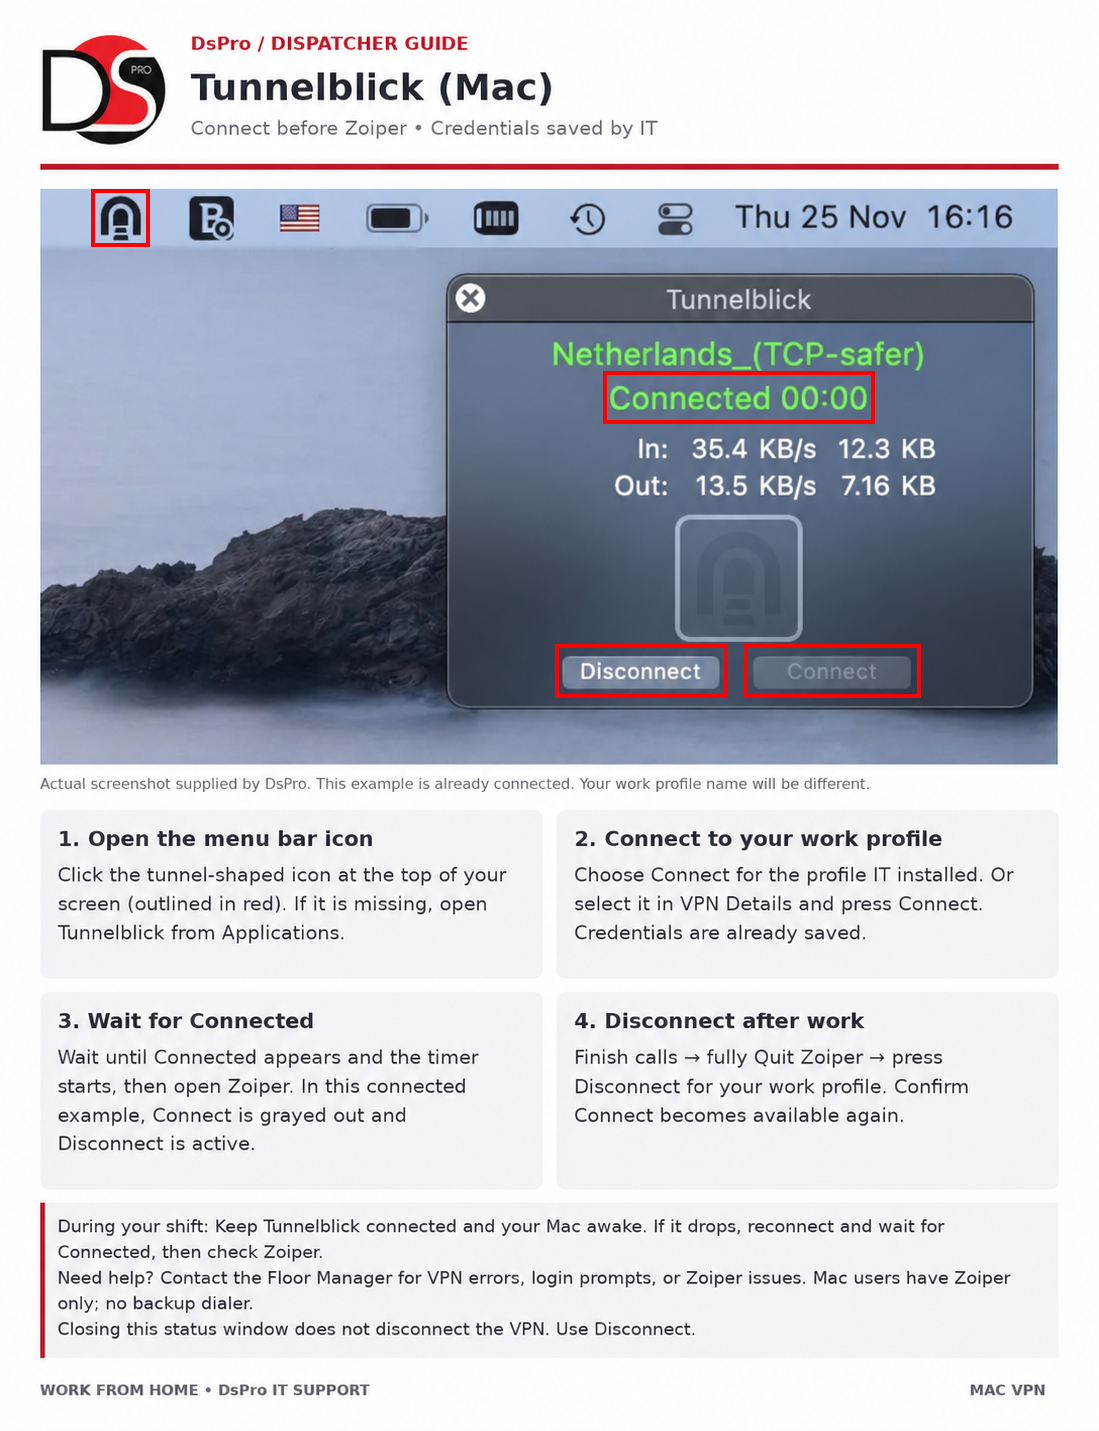
- Open Tunnelblick: Click the tunnel-shaped icon in the menu bar at the top of your Mac screen (outlined in red in the screenshot). If it is missing, open Tunnelblick from Applications.
- Connect to your work profile: Choose Connect for the work VPN profile already installed by IT. You can also select that profile in VPN Details and press Connect. Use your assigned profile, not the example name shown.
- Check the connection: Wait until Connected appears and the timer starts before opening Zoiper. In the connected example, Disconnect is available and Connect is grayed out. Credentials are saved; you do not need to enter them for normal use.
The screenshot shows an already-connected example. Your work profile name will be different, and newer Tunnelblick versions may look slightly different; follow the Connected and Disconnect status labels. If a login prompt appears or the profile is missing, contact the Floor Manager; do not change settings or import a new profile.
Stay connected & recover from a drop
- Keep Tunnelblick connected and Zoiper running throughout your shift. On Mac, Zoiper is the only dialer.
- If the VPN drops, check your internet → open the Tunnelblick menu → choose Connect for your work profile → wait for Connected → check Zoiper again.
- If the VPN will not connect or Zoiper still fails, contact the Floor Manager. They will coordinate with IT.
If the VPN drops, an active call may end. Reconnecting the VPN does not restore that call. Keep your Mac awake and powered during work. Do not change VPN, account, or audio settings yourself.
Disconnect after your shift
- Finish all calls, then fully quit Zoiper. Closing or minimizing a window may leave the app running; use Zoiper’s Quit command.
- Click the Tunnelblick menu bar icon and choose Disconnect for your work profile, or press Disconnect in its connection window.
- Confirm that the profile is no longer connected and Connect is available again.
Closing the Tunnelblick status window does not disconnect the VPN. Use Disconnect after quitting Zoiper. Do not disconnect during a call.
05 / ZOIPER
Your main calling app
Zoiper is your main dialer on Windows. The screenshots below show the Windows interface used in this guide.
Zoiper is your only dialer on Mac. The screenshots below were captured on Windows, but Zoiper 5 uses the same core call controls on Mac: answer/end, mute, hold, keypad, recent calls, and the green account status. Icons or layout may look slightly different.
Zoiper is your main dialer. Transfers are not available in this Zoiper Free setup. Use your department’s dialing format.
Mac: permissions and readiness
- Connect Tunnelblick first and wait for Connected.
- Open Zoiper. If macOS asks to use the microphone, click Allow.
- If microphone access was denied earlier, open System Settings → Privacy & Security → Microphone, enable Zoiper, then quit and reopen Zoiper.
- Confirm the green account check appears before taking calls.
- Use the same core call controls shown in the guides below. Do not change account or audio-device settings yourself; contact the Floor Manager if something is not working.
On Mac, Zoiper is the only dialer. There is no 3CXPhone backup.
Start your shift & dial
- Connect first: Connect your VPN before opening Zoiper. Use OpenVPN Connect and wait for Securely Connected!Use Tunnelblick and wait for Connected. Keep the VPN connected throughout your shift.
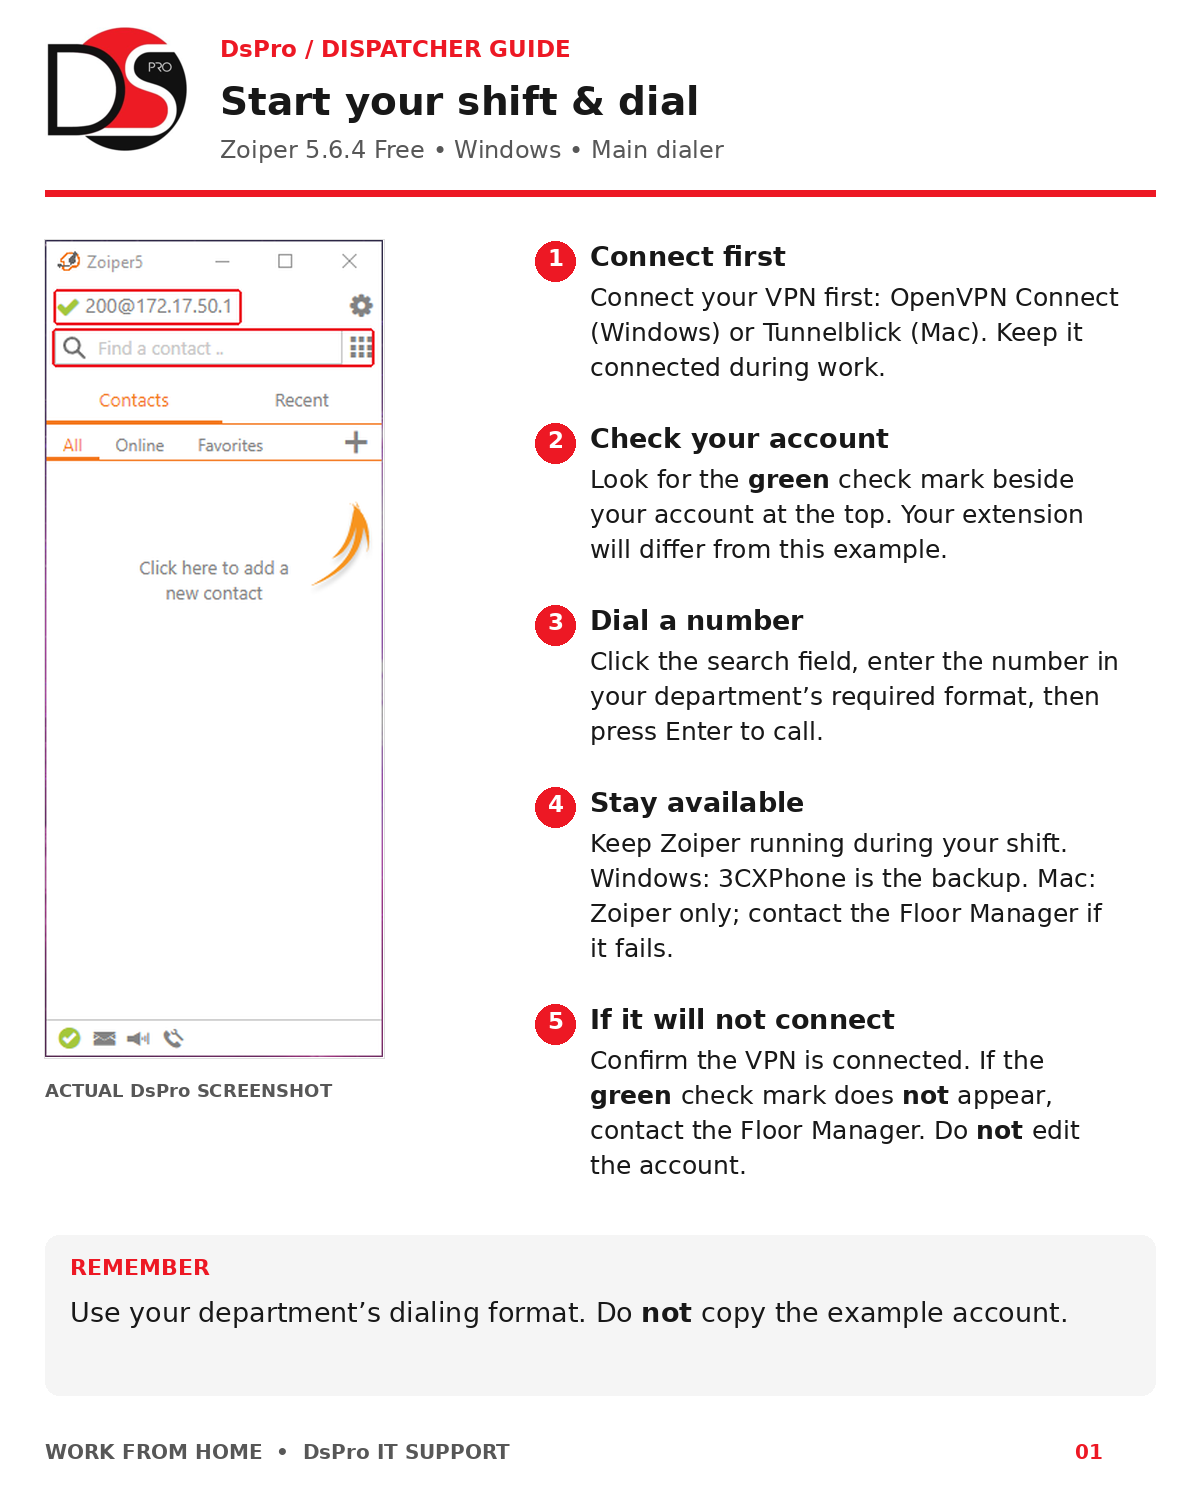
- Check your account: Look for the green check mark beside your account at the top. Your extension will differ from this example.
- Dial a number: Click the search field, enter the number in your department’s required format, then press Enter to call.
- Stay available: Keep Zoiper running during your shift. If Zoiper fails, fully exit it before opening 3CXPhone as the backup.Zoiper is the only dialer on Mac; contact the Floor Manager if it fails.
- If it will not connect: Confirm the VPN is connected. If the green check mark does not appear, stop and use Quick Help. Do not edit the account.
Use your department’s dialing format. Do not copy the example account.
Answer & end a call
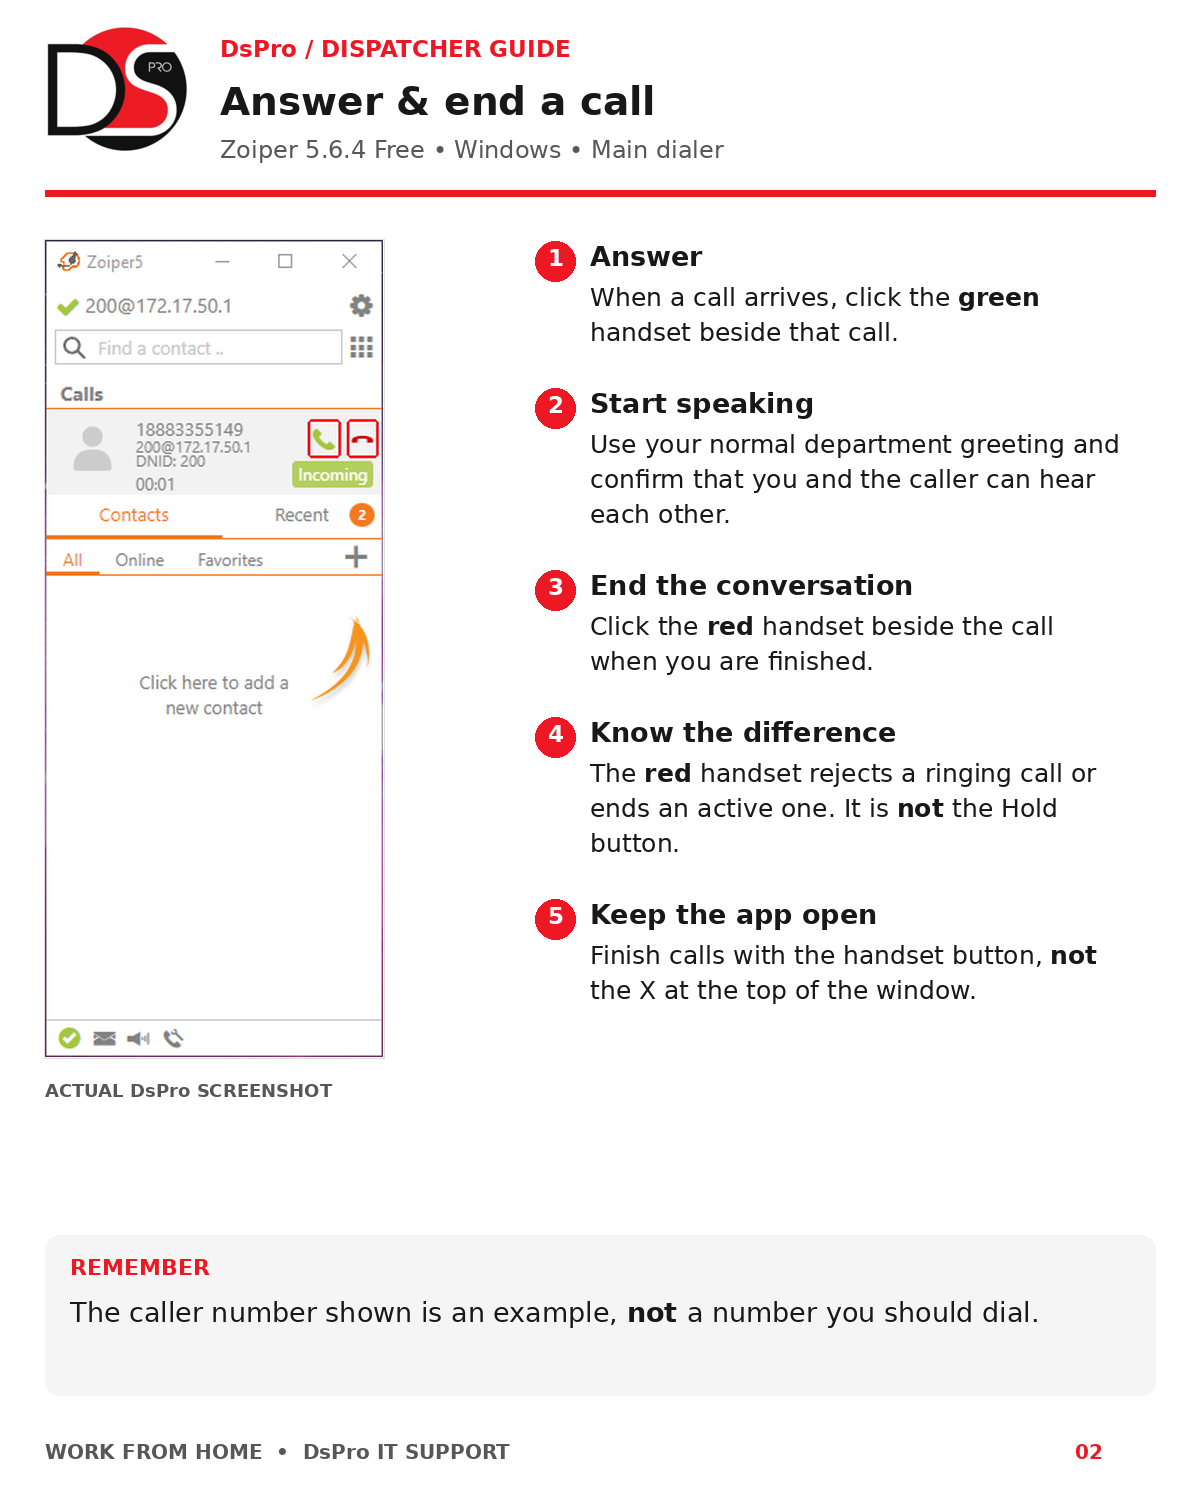
- Answer: When a call arrives, click the green handset beside that call.
- Start speaking: Use your normal department greeting and confirm that you and the caller can hear each other.
- End the conversation: Click the red handset beside the call when you are finished.
- Know the difference: The red handset rejects a ringing call or ends an active one. It is not the Hold button.
- Keep the app open: Finish calls with the handset button, not the X at the top of the window.
The caller number shown is an example, not a number you should dial.
Hold & resume
- Tell the customer: Let the customer know before placing them on hold.
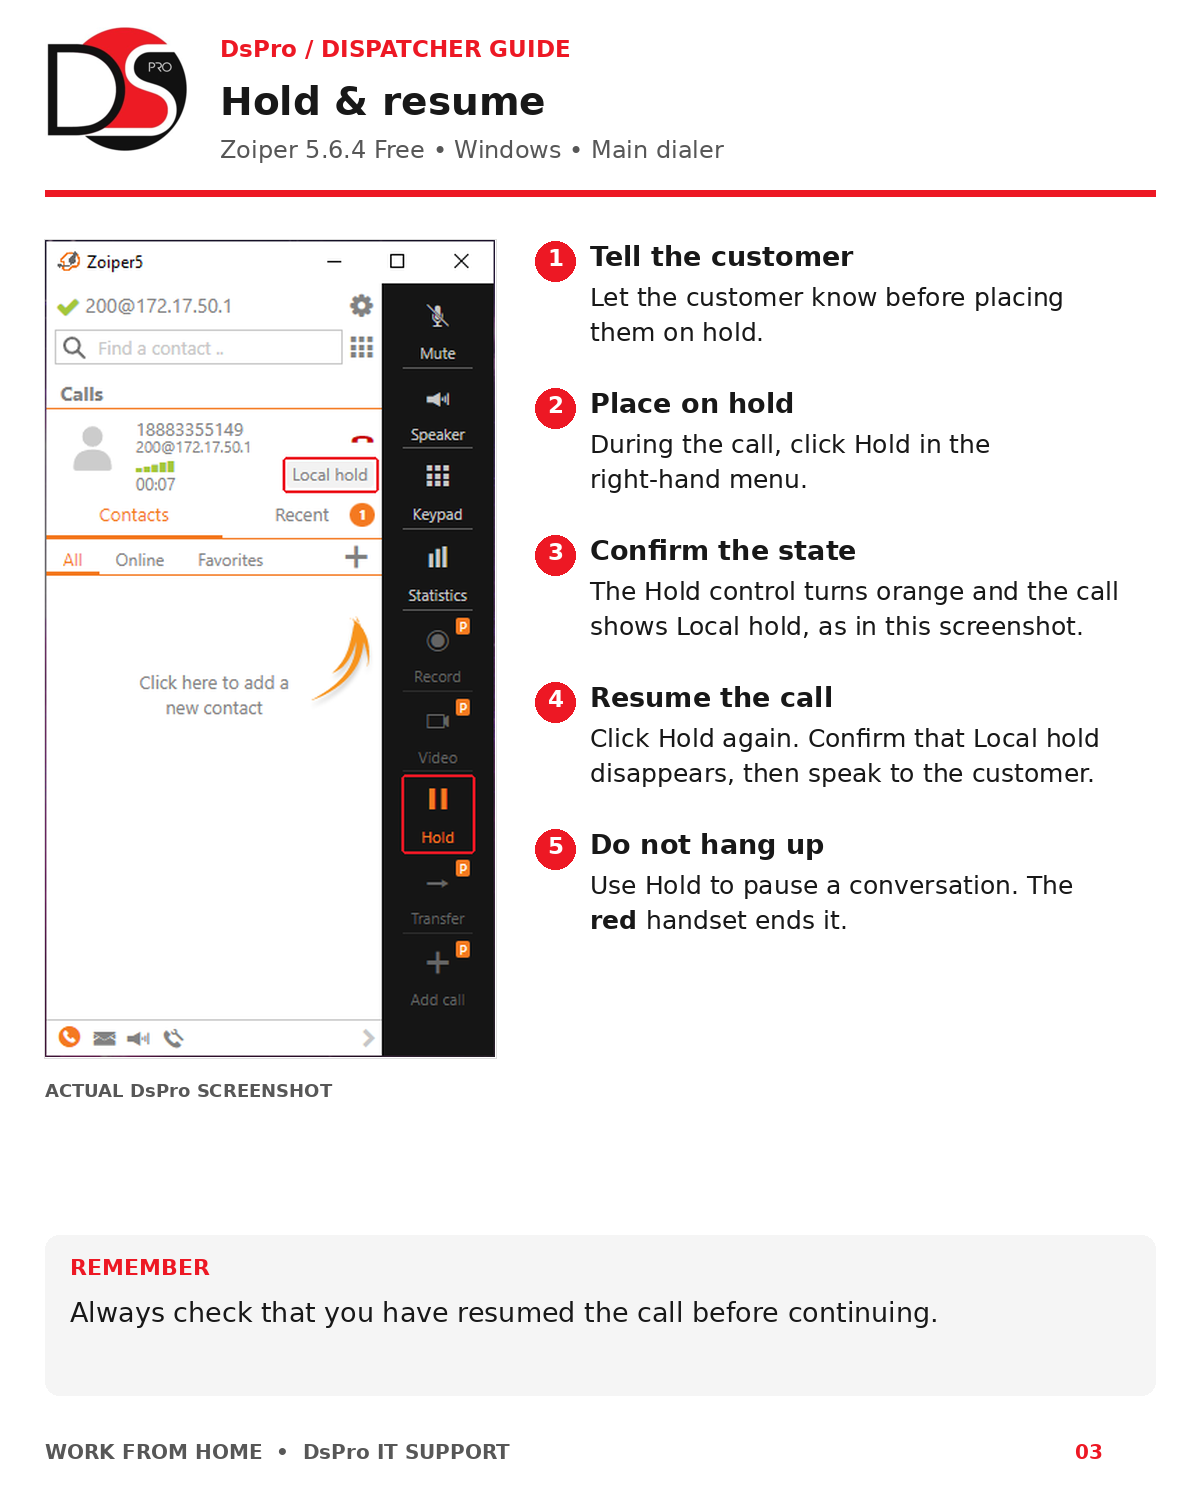
- Place on hold: During the call, click Hold in the right-hand menu.
- Confirm the state: The Hold control turns orange and the call shows Local hold, as in this screenshot.
- Resume the call: Click Hold again. Confirm that Local hold disappears, then speak to the customer.
- Do not hang up: Use Hold to pause a conversation. The red handset ends it.
Always check that you have resumed the call before continuing.
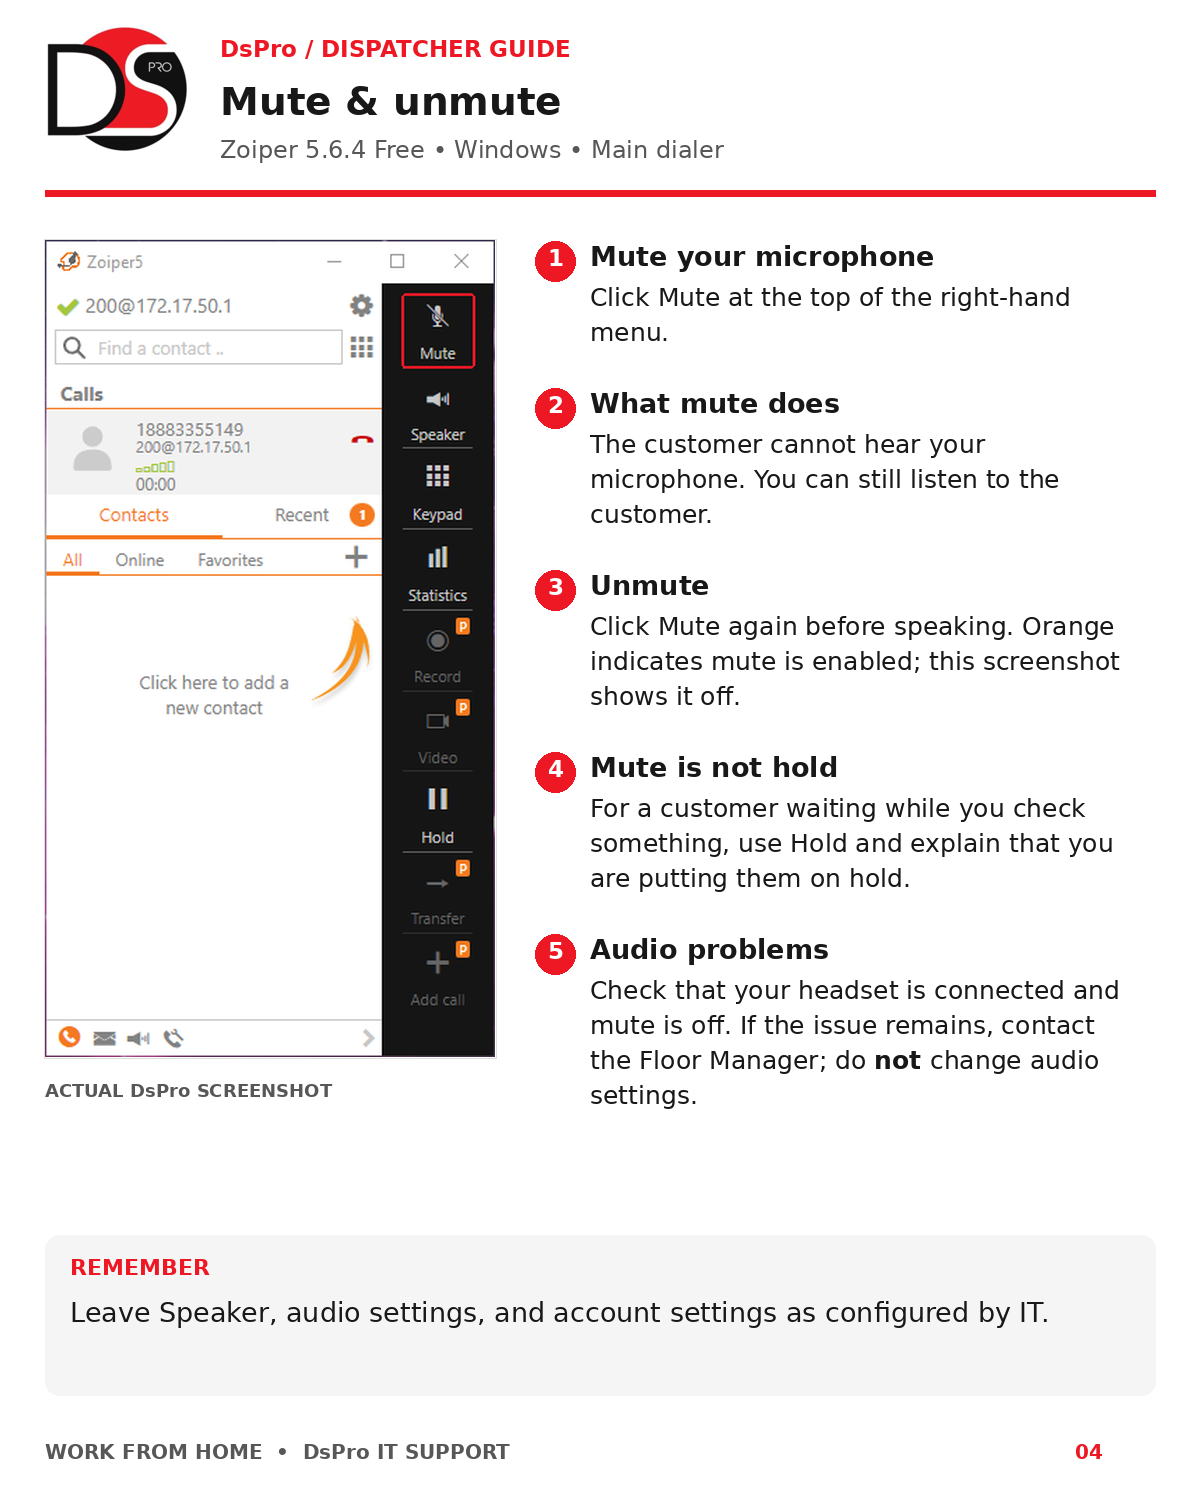
Mute & unmute
- Mute your microphone: Click Mute at the top of the right-hand menu.
- What mute does: The customer cannot hear your microphone. You can still listen to the customer.
- Unmute: Click Mute again before speaking. Orange indicates mute is enabled; this screenshot shows it off.
- Mute is not hold: For a customer waiting while you check something, use Hold and explain that you are putting them on hold.
- Audio problems: Check that your headset is connected and mute is off. If the issue remains, use Quick Help rather than changing audio settings.
Leave Speaker, audio settings, and account settings as configured by IT.
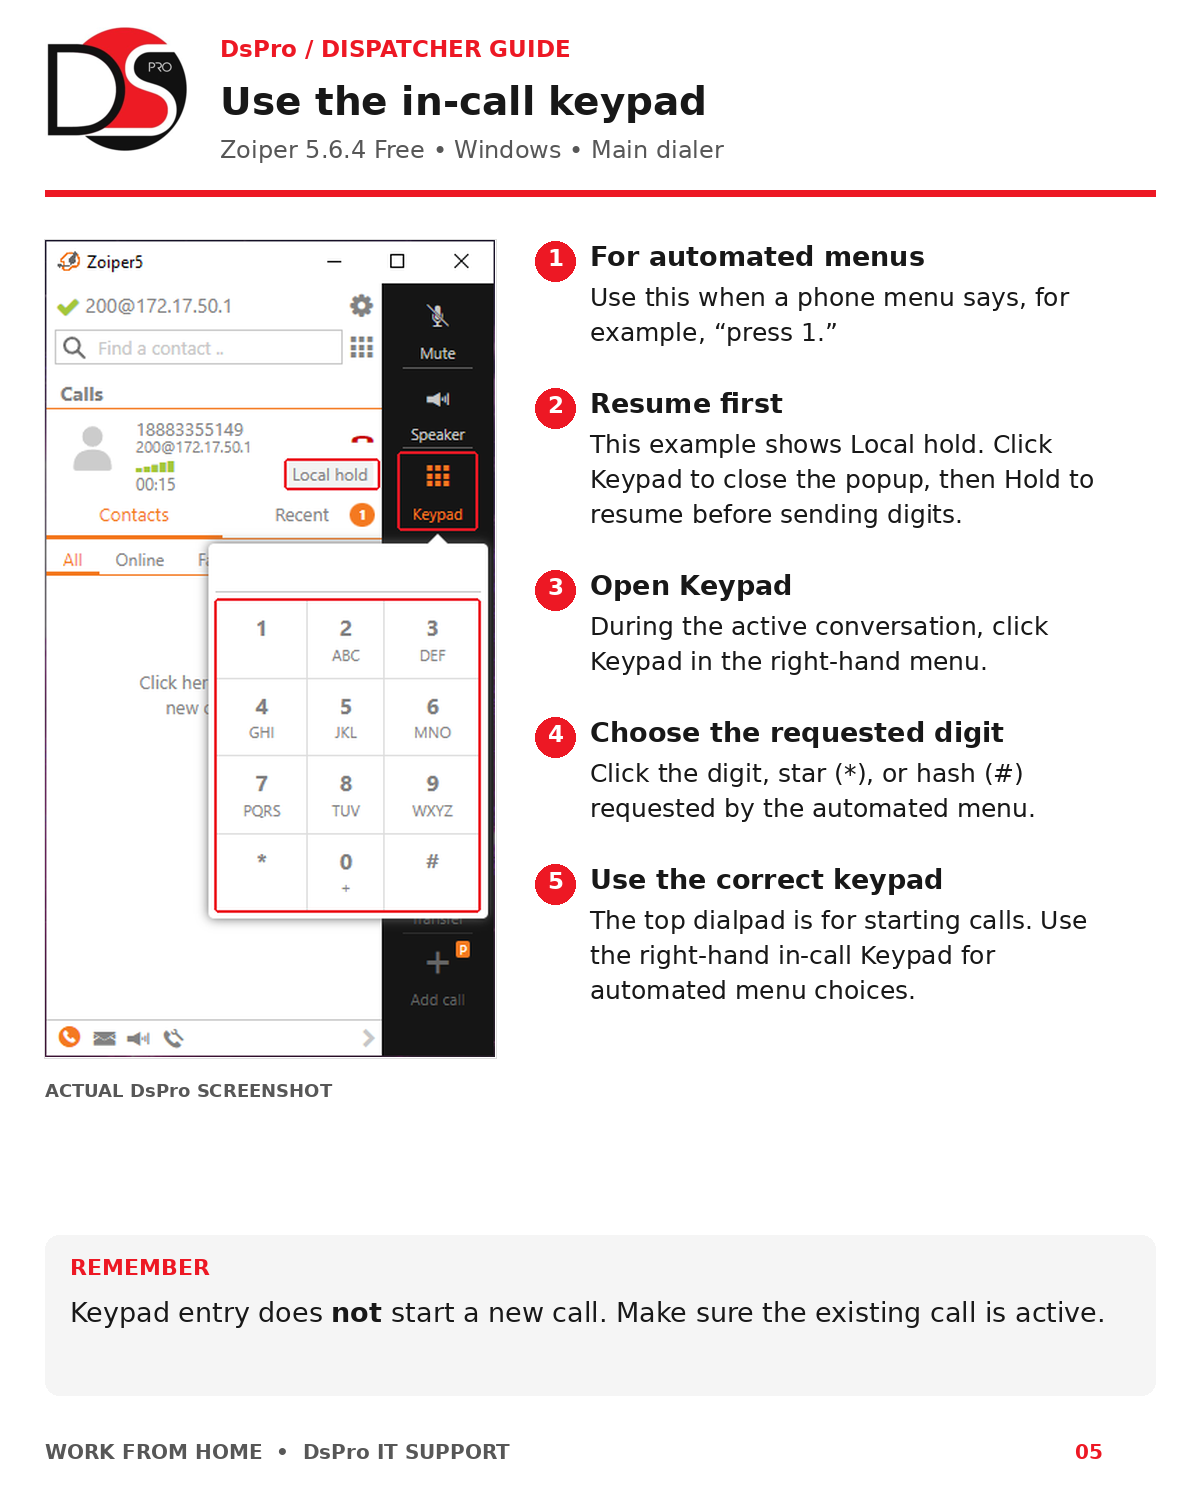
Use the in-call keypad
- For automated menus: Use this when a phone menu says, for example, “press 1.”
- Resume first: This example shows Local hold. Click Keypad to close the popup, then Hold to resume before sending digits.
- Open Keypad: During the active conversation, click Keypad in the right-hand menu.
- Choose the requested digit: Click the digit, star (*), or hash (#) requested by the automated menu.
- Use the correct keypad: The top dialpad is for starting calls. Use the right-hand in-call Keypad for automated menu choices.
Keypad entry does not start a new call. Make sure the existing call is active.
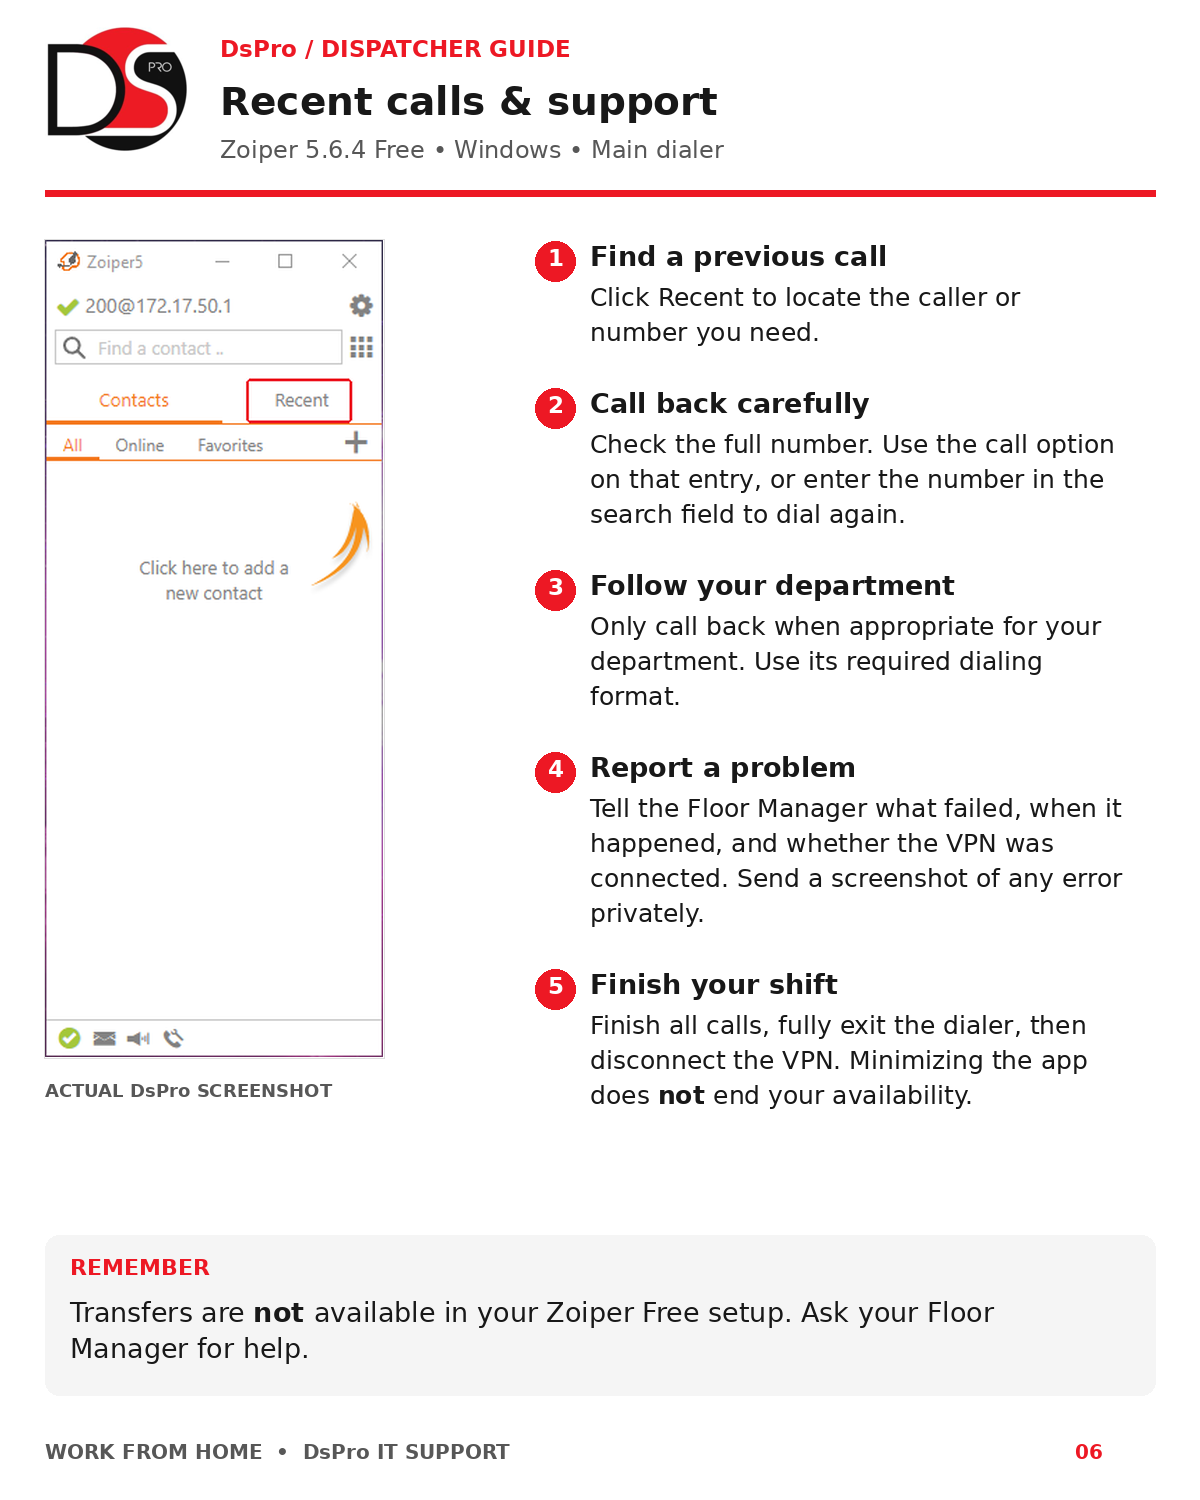
Recent calls & support
- Find a previous call: Click Recent to locate the caller or number you need.
- Call back carefully: Check the full number. Use the call option on that entry, or enter the number in the search field to dial again.
- Follow your department: Only call back when appropriate for your department. Use its required dialing format.
- Report a problem: Tell the Floor Manager what failed, when it happened, and whether the VPN was connected. Send a screenshot of any error privately.
- Finish your shift: Finish all calls, fully exit the dialer, then disconnect the VPN. Minimizing the app does not end your availability.
Transfers are not available in your Zoiper Free setup. Ask your Floor Manager for help.
06 / 3CXPHONE
3CXPhone — Windows backup only
Windows only. Use 3CXPhone only as the backup dialer configured by DsPro IT.
Finish the current call and fully exit Zoiper before opening 3CXPhone. Keep the VPN connected. An active call does not move between apps. Use only the 3CXPhone copy configured by DsPro IT; do not install, update, or reconfigure it yourself.
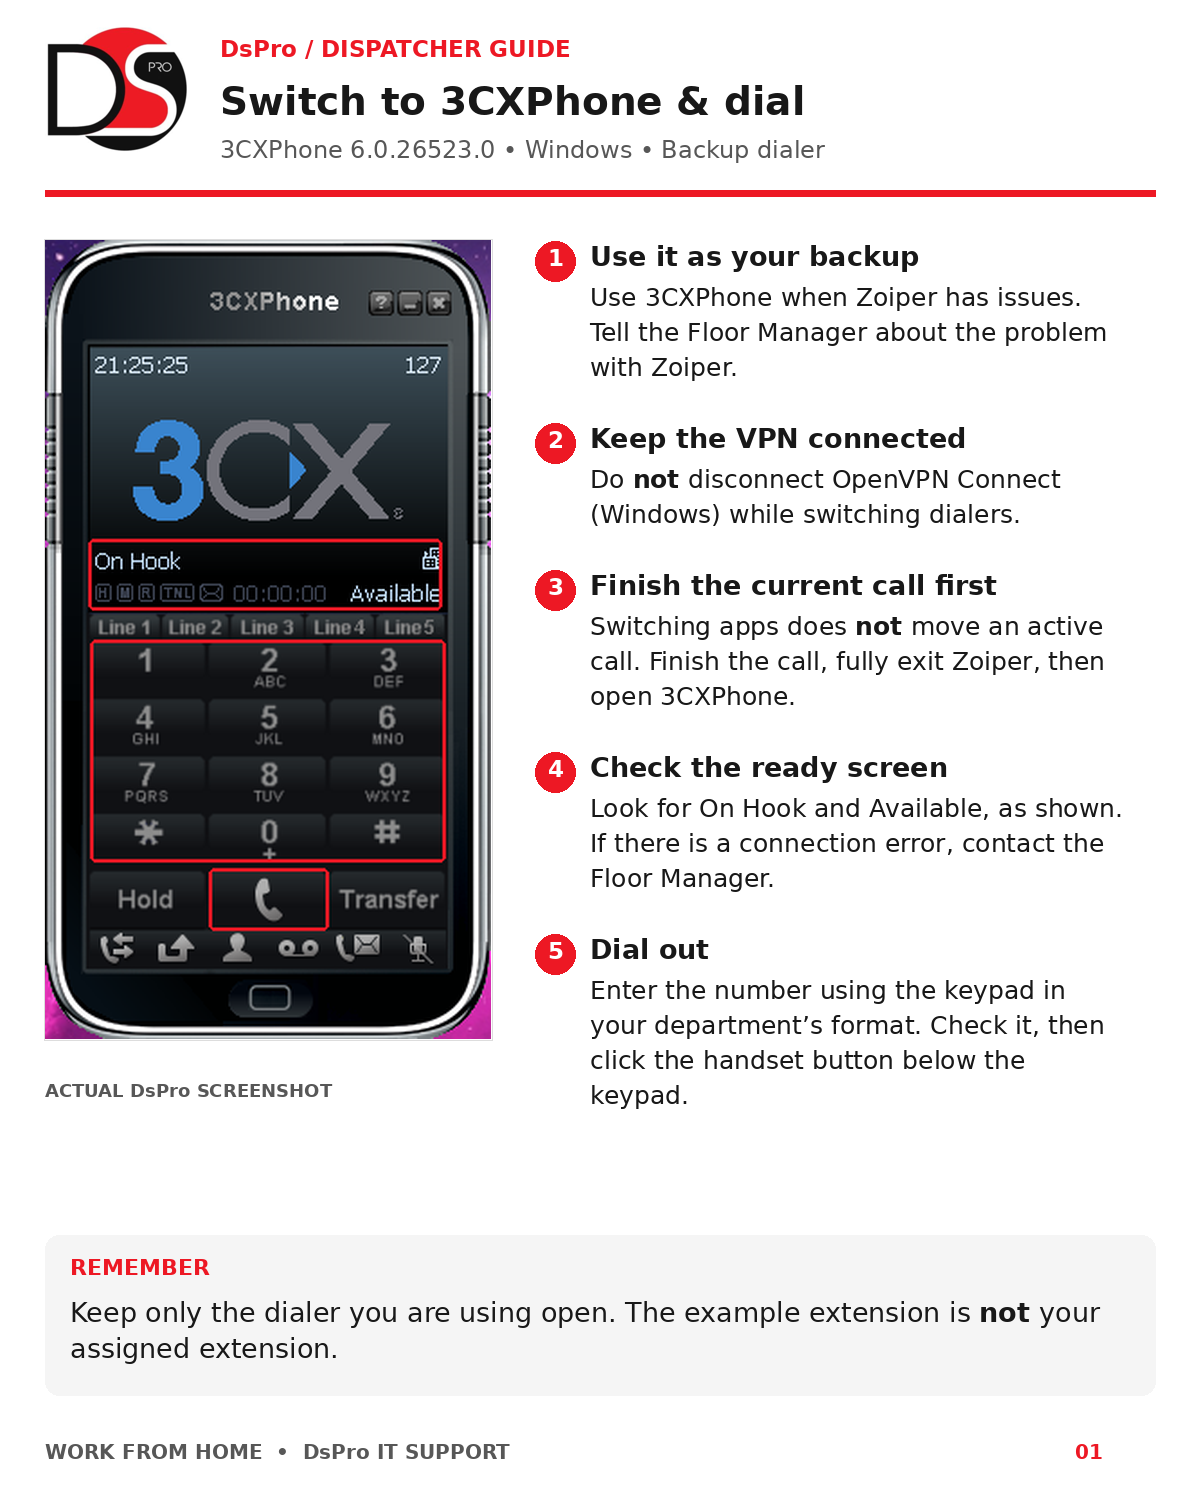
Switch to 3CXPhone & dial
- Use it as your backup: Use 3CXPhone when Zoiper has issues. Report Zoiper issues to the Floor Manager.
- Keep the VPN connected: Do not disconnect OpenVPN Connect (Windows) while switching dialers.
- Finish the current call first: Switching apps does not move an active call. Finish the call, fully exit Zoiper, then open 3CXPhone.
- Check the ready screen: Look for On Hook and Available, as shown. If there is a connection error, contact the Floor Manager.
- Dial out: Enter the number using the keypad in your department’s format. Check it, then click the handset button below the keypad.
Keep only the dialer you are using open. The example extension is not your assigned extension.
Answer & end calls
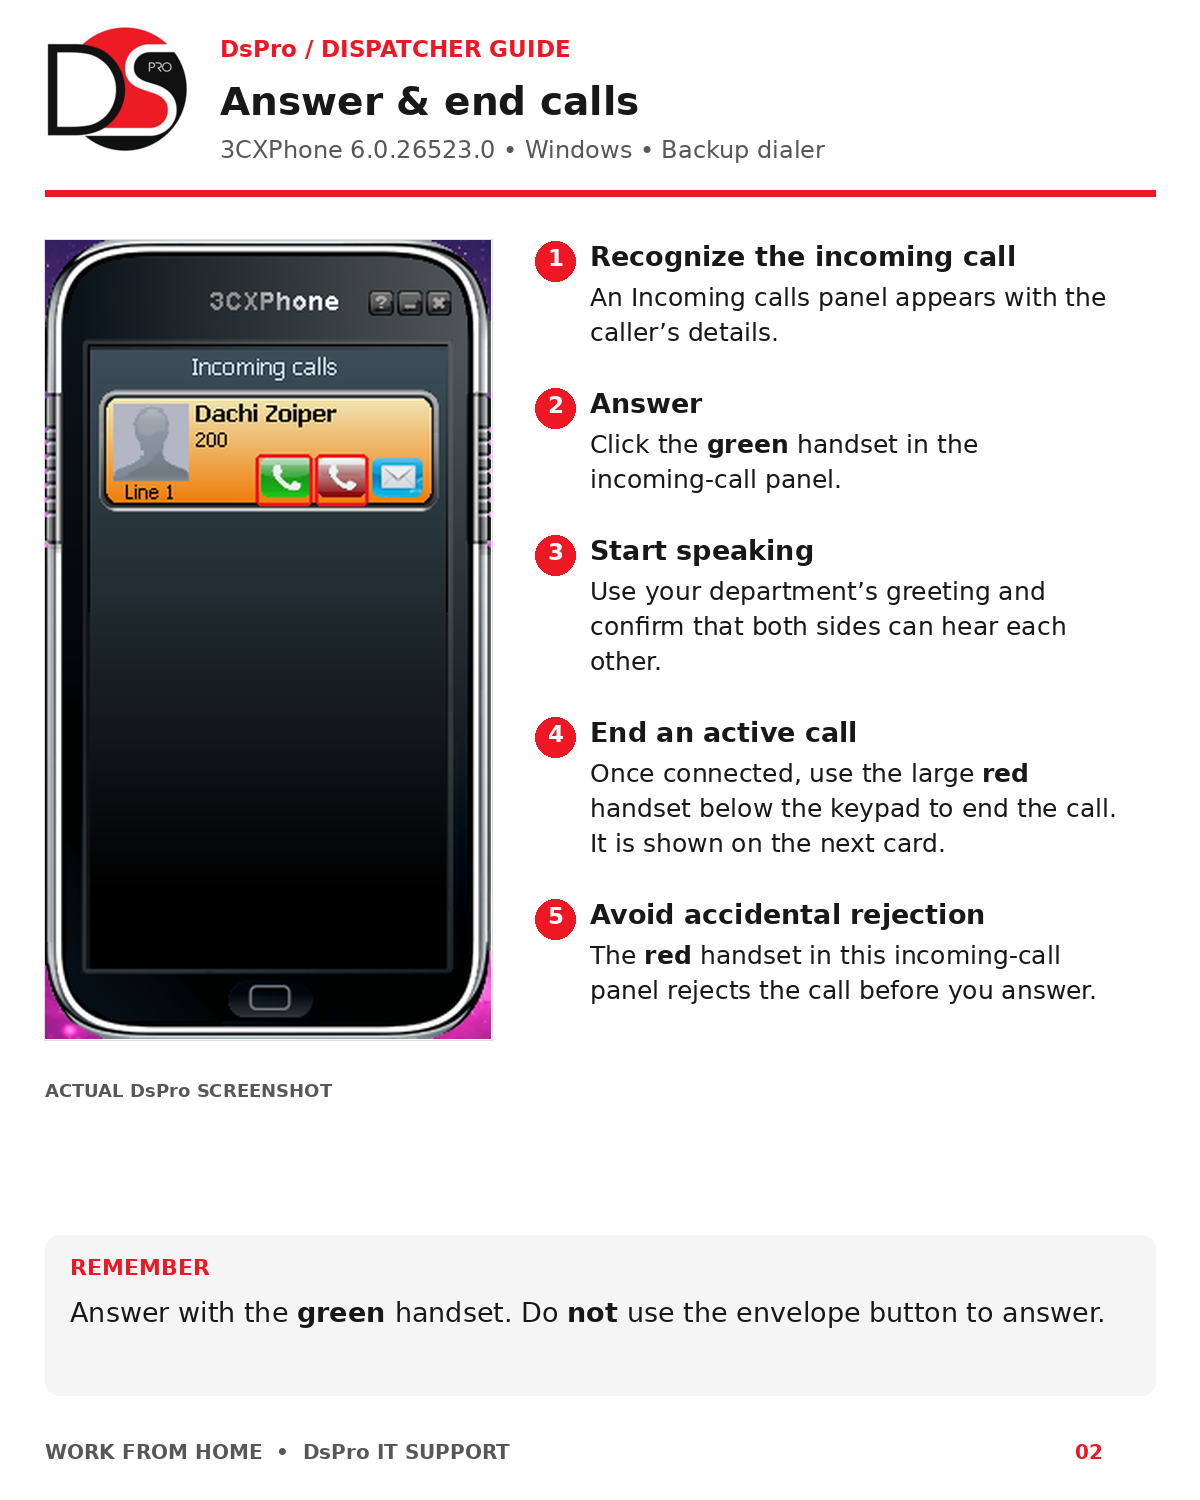
- Recognize the incoming call: An Incoming calls panel appears with the caller’s details.
- Answer: Click the green handset in the incoming-call panel.
- Start speaking: Use your department’s greeting and confirm that both sides can hear each other.
- End an active call: Once connected, use the large red handset below the keypad to end the call. It is shown on the next card.
- Avoid accidental rejection: The red handset in this incoming-call panel rejects the call before you answer.
Answer with the green handset. Do not use the envelope button to answer.
Active call & keypad
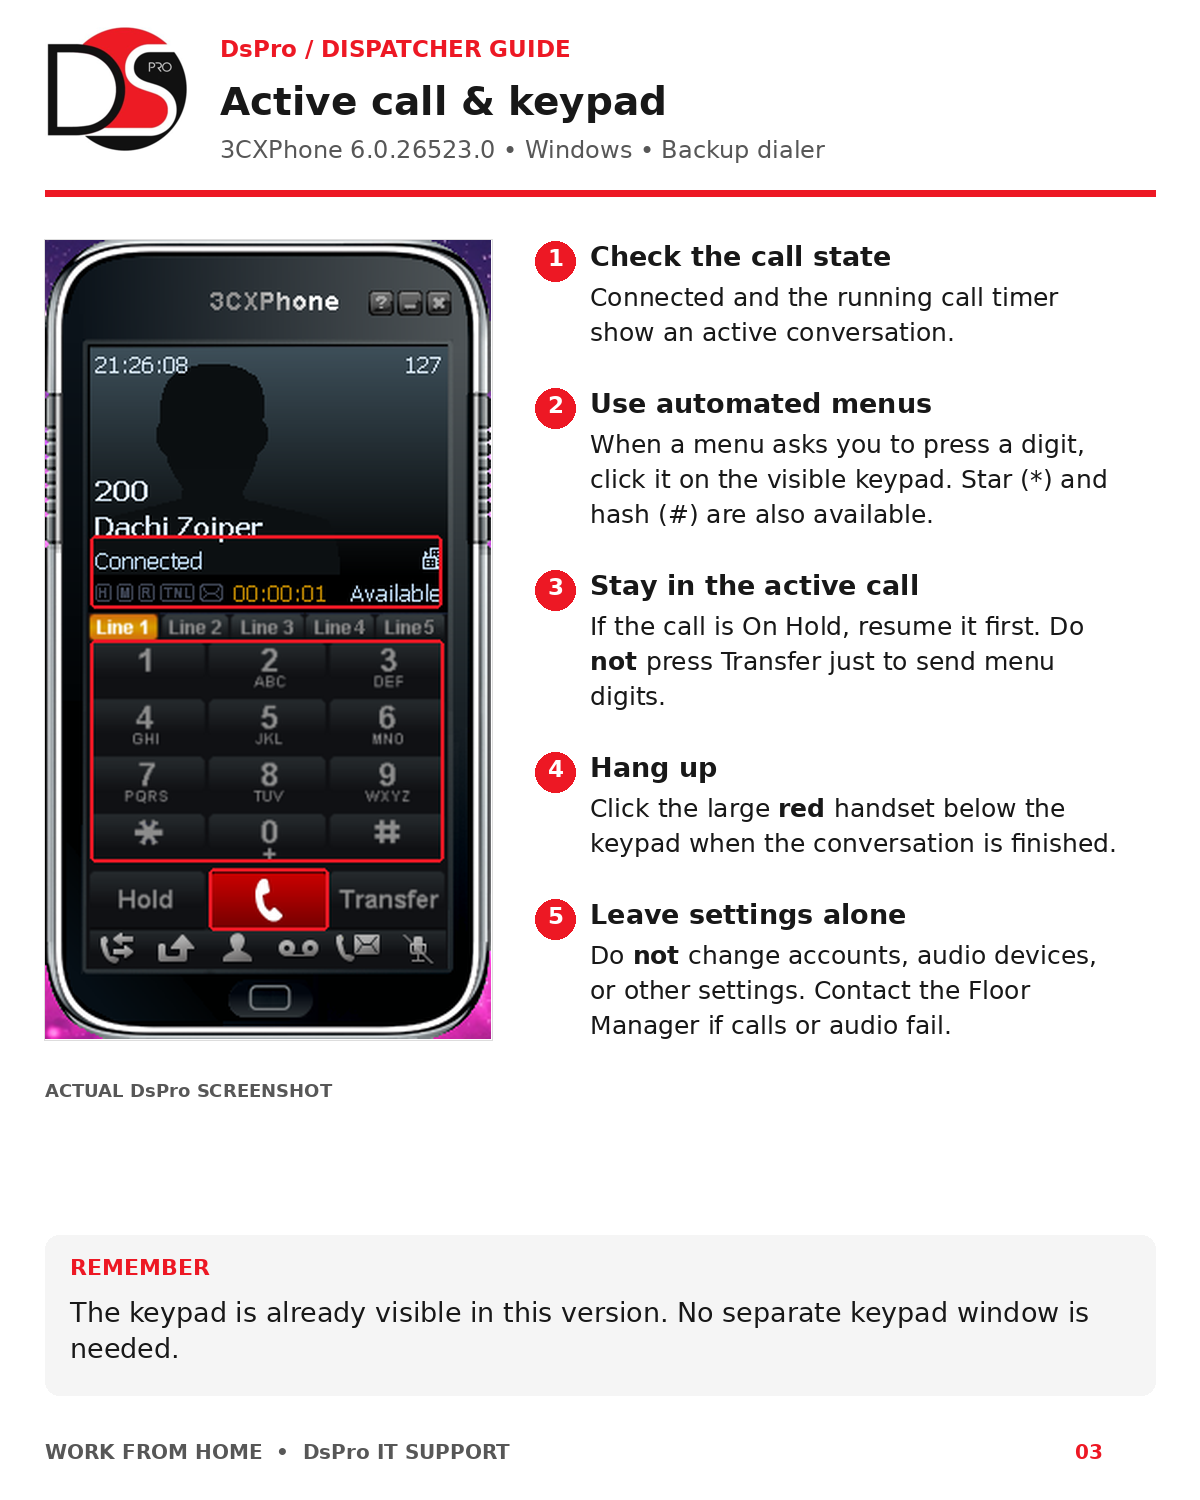
- Check the call state: The Connected status and running call timer show that the conversation is active.
- Use automated menus: When a menu asks you to press a digit, click it on the visible keypad. Star (*) and hash (#) are also available.
- Stay in the active call: If the call is On Hold, resume it first. Do not press Transfer just to send menu digits.
- Hang up: Click the large red handset below the keypad when the conversation is finished.
- Leave settings alone: Leave account and audio settings unchanged. Use Quick Help if calls or audio fail.
The keypad is already visible in this version. No separate keypad window is needed.
Hold & resume
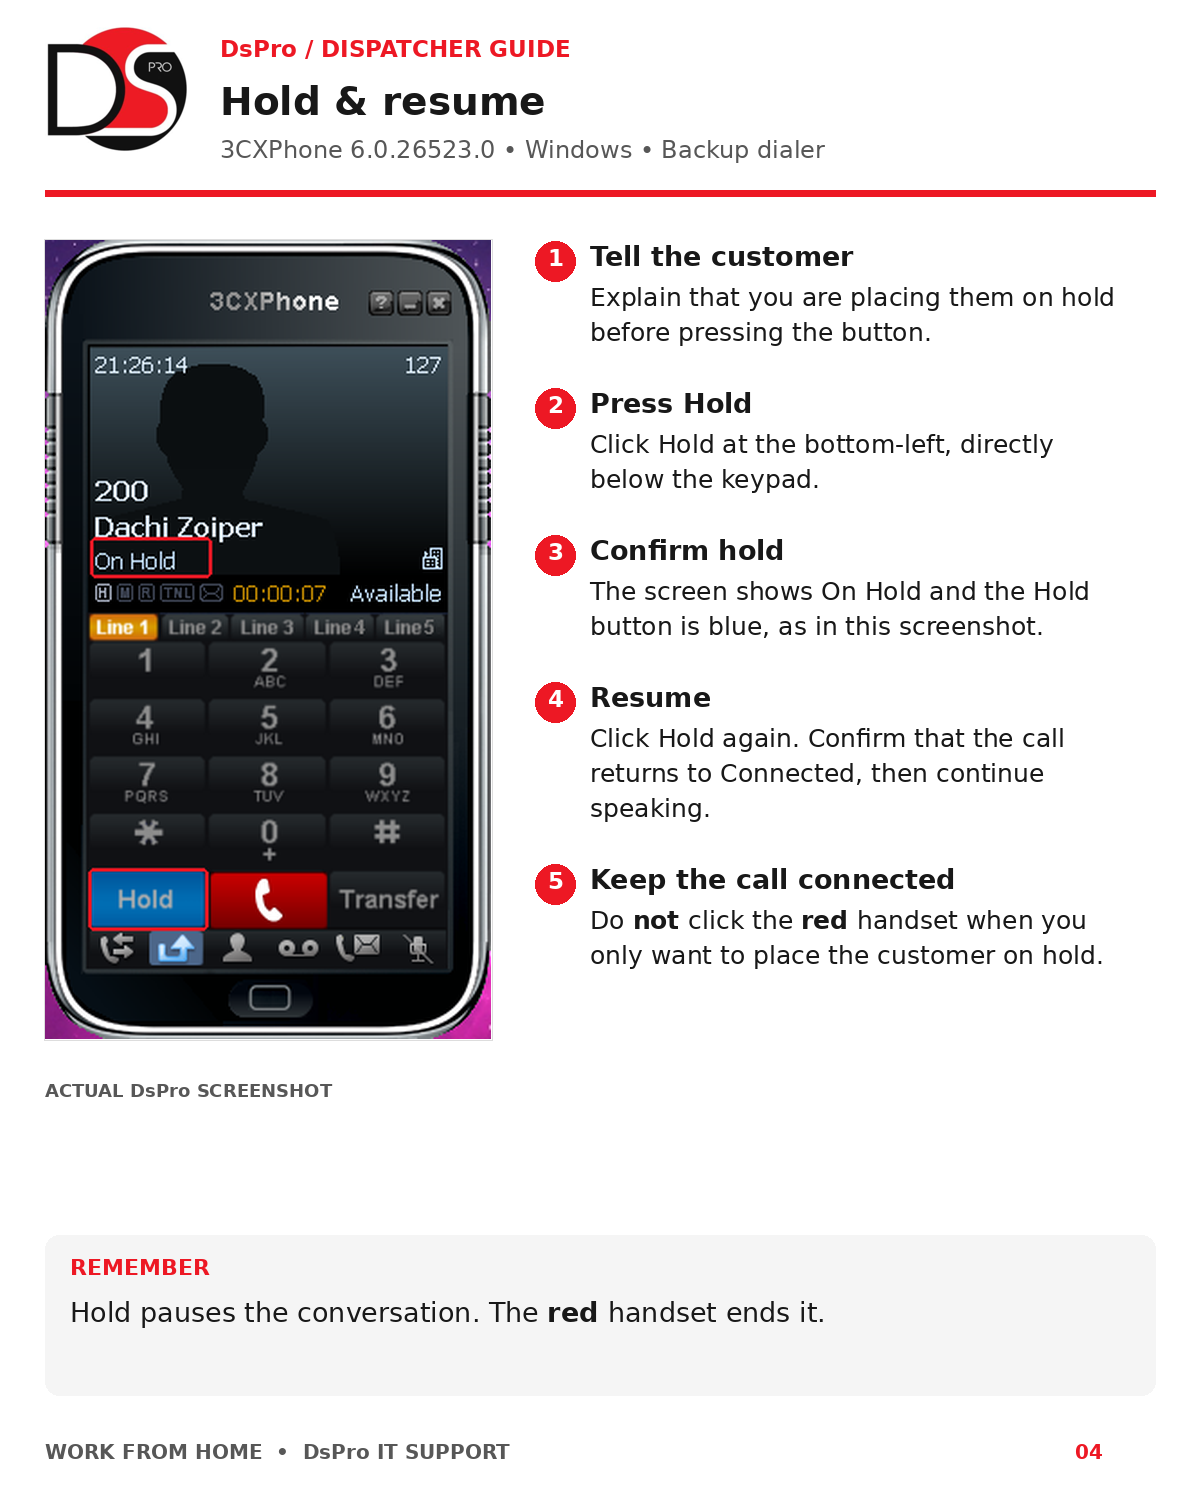
- Tell the customer: Explain that you are placing them on hold before pressing the button.
- Press Hold: Click Hold at the bottom-left, directly below the keypad.
- Confirm hold: The screen shows On Hold and the Hold button is blue, as in this screenshot.
- Resume: Click Hold again. Confirm that the call returns to Connected, then continue speaking.
- Keep the call connected: Do not click the red handset when you only want to place the customer on hold.
Hold pauses the conversation. The red handset ends it.
Transfer a customer
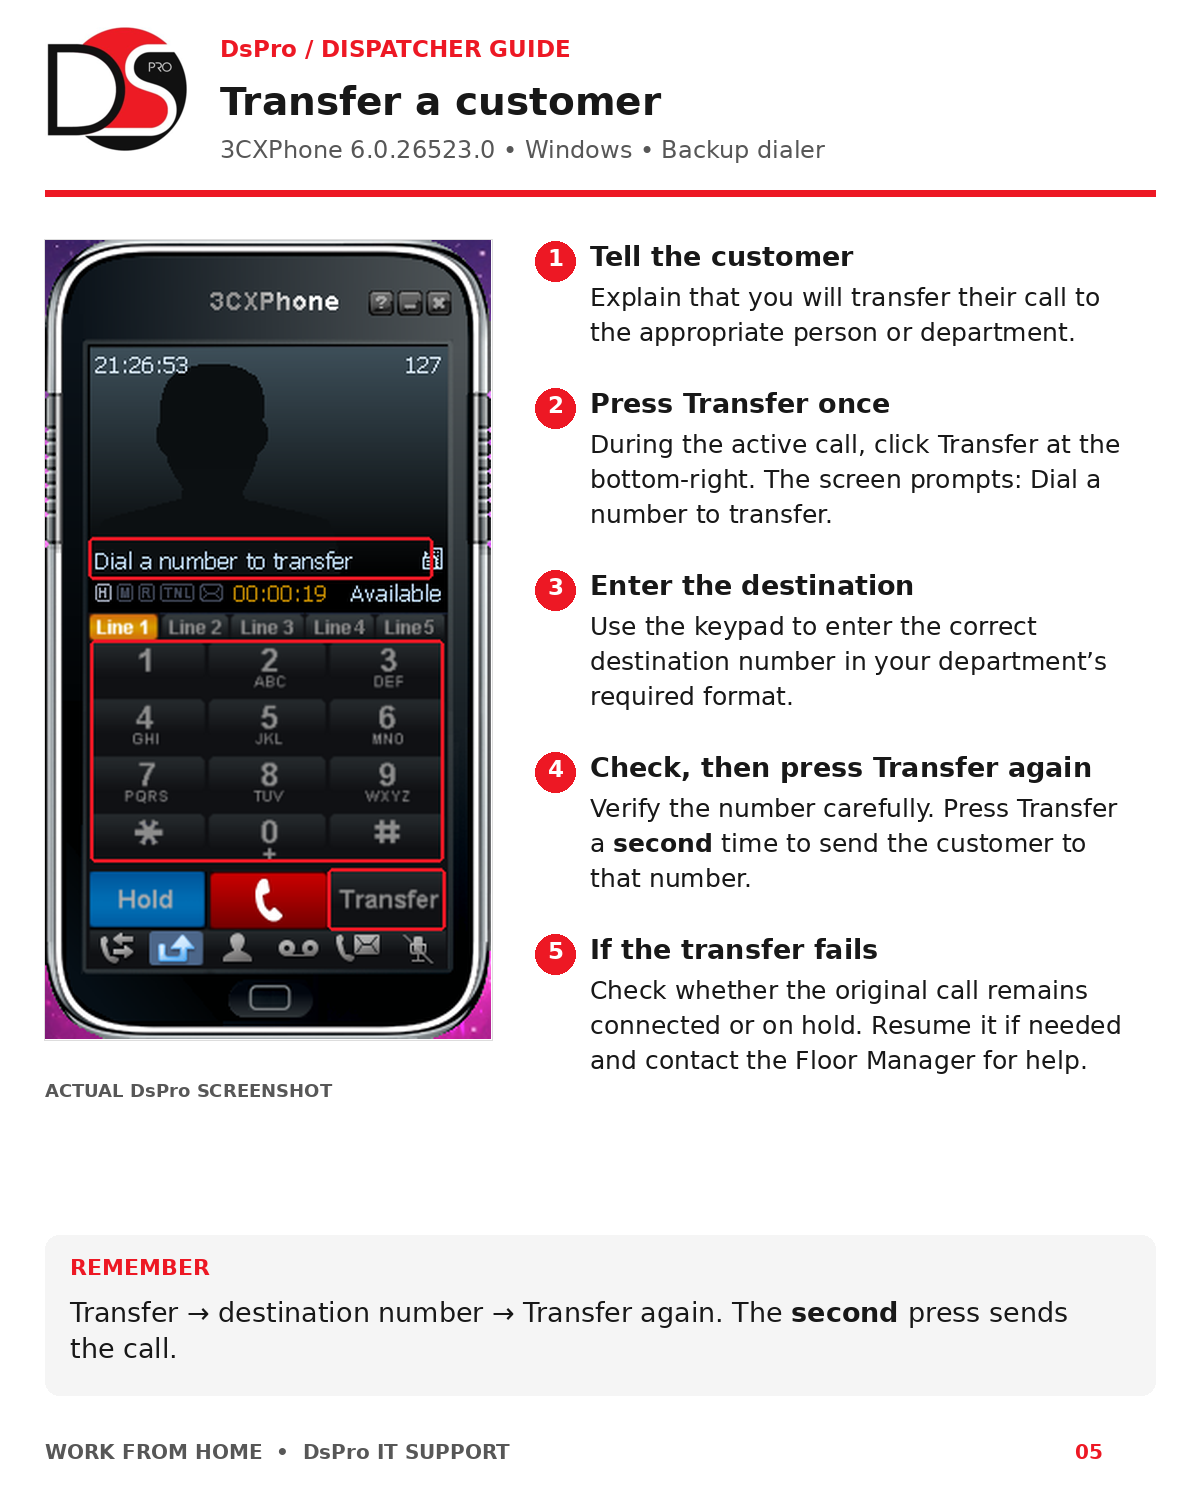
- Tell the customer: Explain that you will transfer their call to the appropriate person or department.
- Press Transfer once: During the active call, click Transfer at the bottom-right. The screen prompts: Dial a number to transfer.
- Enter the destination: Use the keypad to enter the correct destination number in your department’s required format.
- Check, then press Transfer again: Verify the number carefully. Press Transfer a second time to send the customer to that number.
- If the transfer fails: Check whether the original call remains connected or on hold. Resume it if needed and contact the Floor Manager for help.
Transfer → destination number → Transfer again. The second press sends the call.
Mute & get help
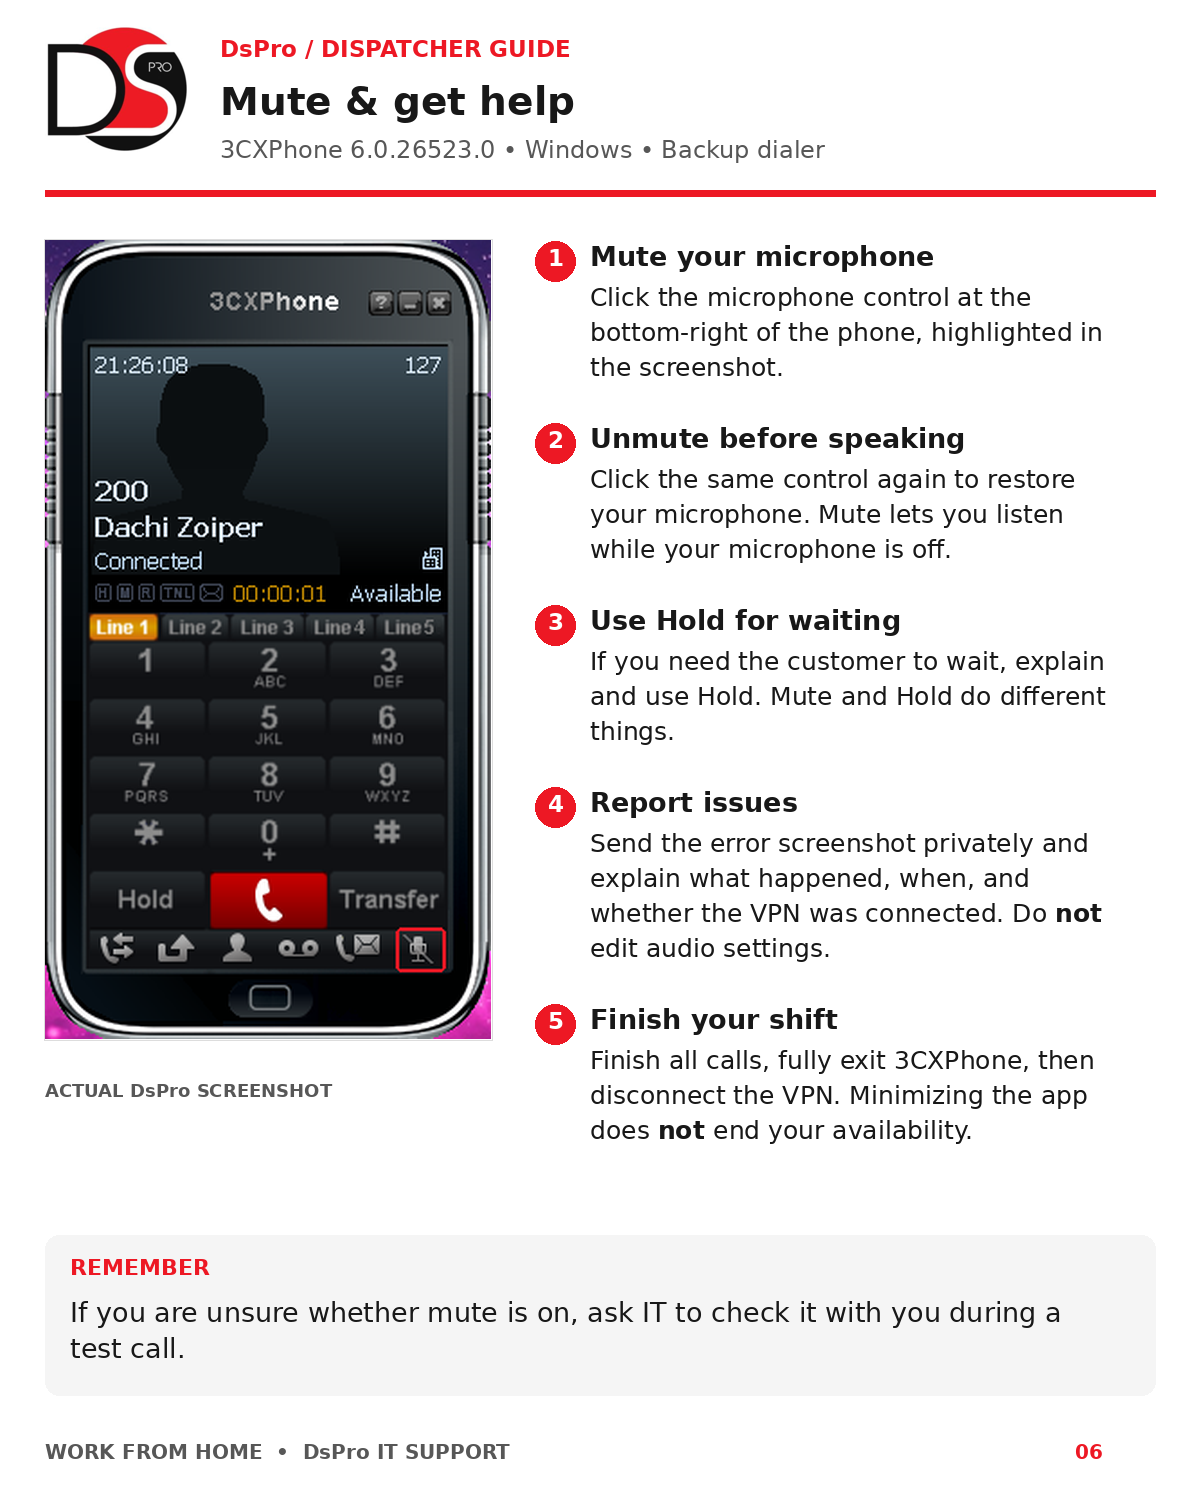
- Mute your microphone: Click the microphone control at the bottom-right of the phone, highlighted in the screenshot.
- Unmute before speaking: Click the same control again to restore your microphone. Mute lets you listen while your microphone is off.
- Use Hold when the customer is waiting: If you need the customer to wait, explain and use Hold. Mute and Hold do different things.
- Report issues: Send the error screenshot privately and explain what happened, when, and whether the VPN was connected. Do not edit audio settings.
- Finish your shift: Finish all calls, fully exit 3CXPhone, then disconnect the VPN. Minimizing the app does not end your availability.
If you are unsure whether mute is on, ask IT to check it with you during a test call.